Hello crafty friends!
How are you all? I love that crafting is such a friendly hobby, it's so lovely to speak to lots of people and share hints and tips! I love it when I meet someone as keen as me about crafty things, I feel reassured that I am not the only paper-sniffing, stamp collecting, Pinterest mad, ink covered, paper hoarding person out there...
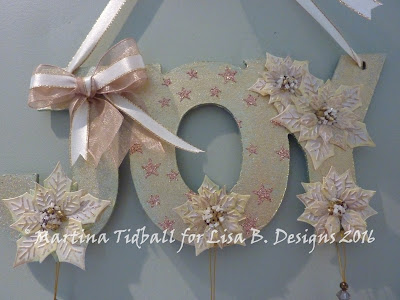
Time for playing with some Christmas MDF this month - something I love!
I started with a blank, un-primed MDF word from Imagination Crafts...
and painted front and back with one of my favourite Starlight Paints: Menthol.
Once dry, I added some Starlights White Gold using a natural piece of sponge, as I wanted to try and get a textured look.
Once this was dry, I used a star stencil from my stash with some Welsh Gold Sparkle Medium to highlight the centre letter with some detail. I love this colour of Sparkle Medium, it goes with so much: vintage, Christmas, male cards, you name it!
Putting the word aside to dry, I set to work on the embellishments. I wanted to add some poinsettias with a difference, so I die cut them in several sizes using some of the gorgeous Woodware Vellum. This vellum is nice and thick and gives a lovely effect when cut and embossed (which I will show you later!) You will notice that I was a little hasty taking some out of my dies and de-leafed a couple, but it didn't matter, as those bits will be hidden in the layers!
Before embossing any of the petals, I used some Spectrum Noir Pencils to colour them. I chose to make the greens/white style of Poinsettia, as this would tone in with my MDF base:
There was no need to be precise with the colouring, it was done mainly to give some tone and difference so that the flowers didn't look 'too perfect'.
Once coloured, I put the petals back into the dies and embossed. A tip here: either emboss in the middle of your machine if you have a large platform one, loosen the pressure if you can, remove a plate or place the vellum in some paper before embossing, so that you protect it and prevent it from cracking.
My next step was to enhance the colour and for this I used Champagne Inka Gold on the edges of the petals. I used my finger to lightly apply the medium, creating a shiny effect.
Once this was dry, I used my finger again, this time applying Imagination Craft's Inca Gold Alchemy Wax all over the embossed areas really making them pop.
To finally assemble my flowers I off-set several layers and glued together. I then used some glue gel to make a centre dome and added some white and yellow seed beads along with some brown glitter. Odd combo I grant you, but I like it!

Wanting to add yet more embellishments to my finished piece, I raided my beading and jewellery stash and used some wire to make some 'hangy bits' (I am sure there is a professional word, answers on a postcard please!)
All bits complete, some ribbon, fiddling with the layout and I was done!
I hope you like it, I had fun with it and loved using lots of different things from my stash to make it.
Love
Martina
xxx


Beautiful Martina, as usual, I love your ideas and all the colours you use, gorgeous xx
ReplyDeleteYou are very kind Jan xx
DeleteThis is gorgeous Martina! Great idea to add the 'hangy bits'.
ReplyDeleteIs there a better word???!!! Glad you like them, a good excuse to use those many thousands of beads I have lying around...
DeleteLovely project Martina, so beautiful xxx
ReplyDeleteThank you xx
Delete