Showing posts with label Royal & Langnickel Water Colour Pencils. Show all posts

Friday, 31 March 2017

Hobby Art Poppy & Distress Ink

Hello crafters, Jan here, it's Friday once again and I have another Hobby Art Poppy  project for you.


I started with a 7" x 7" White Card Blank, then cut a piece of White Super Smooth card cut to 5" x 5".
Using the Stampeazee I stamped the large poppy from the Hobby Art In The Cornfield Stamp Set and using Memento Tuxedo Black just off the centre of the card, then stamped the smaller poppy and a couple of seed heads as you see here.


Next I stamped both poppies and seed heads onto some Mask-It and cut out and stuck them over the images so I could distress half the card.


 I used Tim Holtz Antique Linen Distress Ink and a mini blending tool quite lightly diagonally across the card, then removed the Mask-It.


I then used my Water Colour Pencils for the main images before stamping over one side using the Imagination Crafts Script Stamp.  I joined the seed head to the flower stem with a Fine Black pen.


(Sorry about the quality of the photo in this one)

Next I matted the image onto some Black Card then again onto some White and lastly onto some more black before placing on the main card blank.
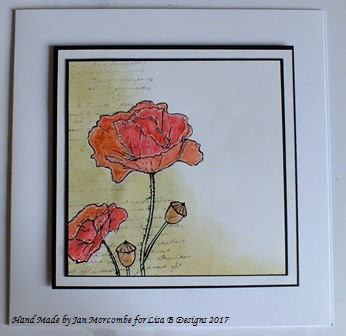


A very quick and easy card today that can be used for most occasions.


***On the website, some Hobby Art stamp sets have been reduced in price by 25% - 40%.***

**Lisa is doing a PaperArtsy workshop on  May 27. For more information click HERE.**

Thank you for popping to see the blog today, please pop back again.

Love, Jan -x-


Thursday, 23 March 2017

A Hobby Art Scene in a Frame


Good morning all! How's you? Martina here with another card using those hares! I quick one from me today and an easy one to do...

Using the scene from the Hobby Art March Hares Set, I stamped onto Watercolour Card and coloured using Watercolour Pencils. The scene was not quite as wide as my die, but that didn't matter, as I drew in some 'extra bits'! Can you spot my additions?


Picking out the brown from my hares, I used some of the Anna Marie Designs Card and layered as a half and half arrangement. I did not need to cover the join in this case, as I knew that my scene was going to cover it all.


Layering my scene onto my die frame, I tilted the picture and fiddled with my layout. I stamped a sentiment from the Hobby Art Birthday Collection to one side and then decided I needed some flowers...Searching through my stash I found some large cream/brown flowers that matched my scene colours, but needed something to mimic the 'lavender' flowers (it would have been a wise idea to look at what I actually had in my stash before deciding to colour them purple!) Doh! At this point, I cheated. I grabbed some dried gypsophila and coloured with a pen...


Easy peasy, but I like it anyway! Next time I will check my stash before starting to colour though!

See you next week,
Martina
xxx

March HaresWatercolour CardRoyal & Langnickel Watercolour PencilsDottie Cafe Latte
 Birthday Collection HA

***On the website, some Hobby Art stamp sets have been reduced in price by 25% - 40%.***


Thursday, 16 March 2017

A Peek Through the Trees with Hobby Art


Hello crafty folks! Martina here and guess what? The SUN, yes, THE SUN, has actually made an appearance!!Beautiful flowers are popping up to say hello and smile as you walk past, the cats are out sunbathing and the garden duties are calling (loudly in my case)!

A Spring themed card for you today, with a look through the trees into a beautiful scene. I had great fun making this one and even a debate with my hubby...read on to find out who won!

The first step was to take the bare trees from the Hobby Art Nature Trail Set and stamp onto some craft card with a dark brown ink (I had already cut the craft card to fit the card blank and allow for matting and layering). Ignore the bits where the branches are randomly cut-off, I sorted that later with a fineliner pen!


Choosing a die from my stash, (not a detailed one, or the main focus of the card would be lost) I planned where to place it.


Obviously I could not just die-cut the shape as it is above, or I would have lost some major tree branches! I drew (with a pencil) around the die shape and then looked at where I needed to make some incisions. I needed to allow the die to sit behind the branches that were within its middle: hard to explain, so see if the photo below explains it better...


Once the die was run through the machine I was left with this...


My next step was to watercolour the trees and add some shading. I also added a sentiment from the Hobby Art Birthday Collection.


Now to colour the scene to go behind the trees. I stamped the entire hare scene from the Hobby Art March Hares Set onto Watercolour Card, adding a little fineliner to extend where I needed to (to fill the die space). I coloured the scene with Watercolour Pencils (47% off on the website!)


To make the trees stand proud from the background, I mounted them using thick foam pads. Some matting and layering and here was my card...or was it? My husband liked it just like that, but I was not happy. The card sat on the shelf for two days and then I just had to add some more to it!


I took some ivy dies and used co-ordinations card to cut them, sanding some leaves to get some variation and some green pen to define the veins. I also found some grasses dies and used some of the new Craft Emotions Edge Mushrooms! These are soooo cute! I chopped the row of mushrooms up, chose a few that I wanted and coloured with the same pencils as before. Much better methinks!


I won in the end! I think my husband liked it in then end when I had finished tinkering...

Thank you for reading and I look forward to seeing you next week!
Love
Martina
xxx

March HaresBirthday Collection HANature TrailWatercolour CardRoyal & Langnickel Watercolour PencilsEdge Mushrooms CED


Friday, 20 January 2017

Hobby Art Floral Bird House - New Home


Hello all, today's little card is using the Hobby Art Floral Bird House Stamp set and the MDF Bird houses.


I started with a blank white 7" x 7" card and matted it with some pale blue decorated paper from my stash.  I then cut a white mat and embossed it with a favourite folder of mine also from my stash.

 
I then stamped the Hobby Art Floral Bird House Stamp set onto some white super smooth card a few times, so that I could use the spare to decoupage.
 
 
I then cut the left hand image down to 7cms x 12cms and matted that on to some more blue paper.  I coloured in all the images using Water Colour Pencils and cut around the images I wanted to decoupage or use as elements.
 
 
I added a little extra matt with some darker blue paper from my stash so it would help make the stamped image and MDF stand out a little more.
 
I then took one of the smaller MDF Birdhouses and distressed the edges using a craft knife to take off the really harsh dark brown marks.  I then cut a silver mirri mat 6.5cms x 6.5cms and matted that with a 6 x 6cms white card and stuck the MDF house in the centre and used two of the little birds I had cut out, the left hand bird was stuck flat and the right hand bird stuck on with a foam pad.
 
Both the Stamped birdhouse and the MDF birdhouse toppers where mounted using 3D foam.
 
I cut a couple of banners for my sentiment and also to add a few more elements, I bent them up for dimension.
 
I added a couple more little embellishments I'd coloured and cut out to finish off the card.
 
Very quick but sweet little New Home card that could also be used as birthday or get well too.


Thanks for dropping by the blog again today and hope we've inspired you.  
See you next time. Love Jan -x-