Showing posts with label Imagination Crafts Clematis Elements. Show all posts

Friday, 21 July 2017

Rice Paper and Die Cuts

 
Hi there crafters, Jan here today.  I'm having a nice break from work at the moment and enjoying the time to craft.  Shame about the weather though.
 
Today's card is carrying on with the Rice Paper and Shabby Chic look, there are lots of  Rice Paper to choose from on the website.
 
 
Using  a 7" X 7" White card blank I placed the  Rice Paper over to see where I wanted the image to be.
 
 
Once that was decided I turned the whole thing over and traced around the card using a small paint brush and some water to get that lovely frayed edge from the rice paper.
 
 
Keeping the spare Rice Paper to one side to stamp some flowers onto and decoupage later.  This is the image I wanted before I started to embellish.
 
 
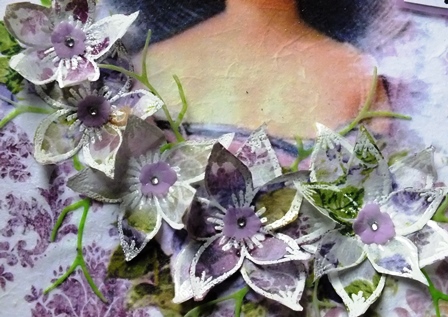
First of all I stamped the gorgeous flowers heads from the Imagination Craft Clematis Elements Stamp Set (on sale at 29% off)  onto the spare Rice Paper using Versamark and Wow Bright White Embossing Powder, and stamped the large flower head twice and the smaller flower head five times.  I know I've been using these flowers a lot lately but I do think they make a gorgeous decoupaged flower, especially stamping on the Rice Papers.
 
I then cut the Craft Emotions - Branch With Blossoms die as follows:
Branch - White Card - Once
Blossoms - Lilac Vellum - Twice
Leaves - Pale Green Vellum - Twice
Branches - Pale Green Vellum - Several Times
 
For the lilac and green vellums I used Pure White Vellum and coloured them up using markers letting them dry before die cutting.
 
 
I then placed one small flower inside a larger flower using Cosmic Shimmer Glue.  I arranged them on the card where I thought they looked right and glued all the elements onto the main card once I was happy.
 
 
Here's a little close up of the Craft Emotions - Branch With Blossoms die, which I added a tiny gem to centre.

 
I thought it needed a little sentiment so stamped a few words from the Imagination Crafts Art Stamp set - Time to Celebrate cutting them at a jaunty angle and backing with some coloured vellum and 3D them onto the card.


Quite Shabby Chic I think, hope you enjoyed the blog today and thanks for dropping by as usual.
 
Love Jan -x-


Friday, 14 July 2017

Rice Paper Easel Card

Hi there all, hope you're all doing ok.

Today's little card is another easel, I'm enjoying making these at the moment.  But this time going a bit shabby chic with the Imagination Crafts Rice Papers and my take on last Friday's workshop.

 
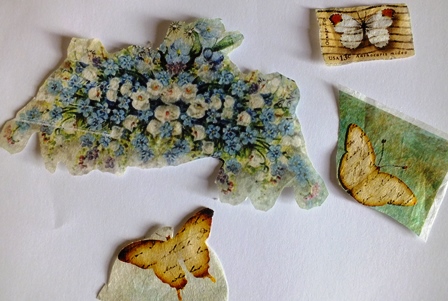
So using the materials from the class pack I cut out the large butterfly roughly then glued onto some white card using the Imagination Crafts Magi Bond, I love this stuff, then cut it out and left to one side.


Next I chose a few elements from the rest of the Rice Paper .


I then took the ready cut background card and glued them randomly into place using the Imagination Craft Magi Bond.  I left that all to one side to dry off.


Next I prepared the easel in the normal way by taking a 7" x 7" card and folding the front in half then cutting a piece of white card the same size as the card to add the image to and would be the upright of the easel card.

The base of the card I cut a another piece of silver mirri card the same size as the supplied piece and covered it with some Imagination Crafts Rice Paper leaving a border of silver showing.


I went back to the main feature of the card and embossed using the Crafter Companion 3D Regal Swirls Embossing Folder.


Very nice, these 3D folders are brilliant.

To make the embossing stand out more I used Antique Linen Distress Ink, the same way as in the class, and lightly blended the colour avoiding the Rice paper elements.  So rather than use the foils I thought I'd give it it's drama by just using Sparkle Mediums.  I went over the whole image with Imagination Crafts Sparkle Medium Silver Dollar then Blue Moonstone using my finger to apply the medium which gave it the occasional foiled look anyway .  I did the same on the wings of the butterfly.


I decorated the butterfly with the little embroidered sample and added the flower we had in our packs.

 
I matted all the layers together by first placing the main image onto the blue basic Bazzil card stock then onto the silver mirri before sticking all onto the upright of the card.  Then using double sided tape and a little cosmic shimmer I set the upright into place.
 
The last things to do where to add the easel block that makes it stand up, so cut a piece of the same basic Bazzil card and 3D it placing it about a third of the way up the base of the card, then added a little sentiment.
 
I then wanted to use the Imagination Crafts Clematis Elements stamp set to create 3 flowers, so I glued some Rice Paper onto some white card, leaving to dry before stamping 3 large and 3 small flower heads with Versafine.
 
 
I cut them all out and glued the smaller flower head inside the large, shaped them with a ball tool and place a blue gem in the centre of each.  I don't like throwing away any waste so I cut out two little butterflies and placed them on the base of the card to finish it all off completely.


Well that's it for today, I hope you enjoyed the blog today, I must admit the Rice Papers are one of my favourites to use and there are so many to chose from, you could use any to create a card like this weeks.

Back again next week
Love Jan -x-


Friday, 7 July 2017

Circle Easel Card

Hi there crafters, hope you're enjoying the warm weather, a bit too warm for me though.

Today's little card is using the Indigo Blu Ella Bella (Sale on the web site) stamp again, I think she's quite effective, again I also used the Imagination Crafts Clematis Elements as I love the fact you can use the flower heads for a background, as I did with this card, but also cut them out to be 3D.


First of all I folded a piece of A4 White card in half, then using my largest circle die, I placed it on the folded card so the die just slight hung over the edge so was able to open the card.

I then cut a single circle for the stamped image.


Next was to do some matting and layering with Bazzil Basic Black Card Stock.


Then assembled the plain circle card onto the easel


I then wanted to created my own background card by using the flower heads from the Imagination Craft Clematis Elements, I used one large and one small flower head.     I stamped the largest head using Versafine and stamped directly onto the card, the smaller flower head I decided to secondary stamping.

 
I then cut a smaller circle in the basic black then mounted the background card onto that.  I cut another smaller white circle of card for my main image.   I wanted to use the  Indigo Blu Ella Bella again, I think she's quite striking.  This time I stamped her with Versafine and embossed using the Wow clear embossing powder.  I gave it it's vintage look by distressing with Hickory Smoke Distress ink and just blended it slightly around the edge of the image, then matted all the elements together.
 
 
The next step was to embellish and place the easel stopper together.  So cut a small piece of black card then white to matt them together, I placed some 3D foam pads on the back for height and placed a little Happy Birthday sentiment in the centre.


I stamped the two flower heads three times each so I could cut them out and create 3D flowers.


So placing the small flower head inside the large one and put a gem in the centre of each.  I then cut out a couple of little butterflies, added a gem and placed them around the image.  Popping the flower heads on and, voila it was done.  Nice and easy, so hope you liked it.
 
Here's the card again.


Look forward to seeing some of you at the class today and thank you for dropping by the blog today.
Love Jan -x-


Friday, 16 June 2017

Ella Bella Silhouette

Hi all, Jan here, using the Indigo Blu Ella Bella stamp again this week but with a little bit of colour.


As always, I started with a square white card and cut a piece of black card 5.5" x 5.5" and a piece of super smooth white slightly smaller.

I created the background using the Imagination Crafts Crackle Mosaic Stencil, taping down in the usual way. 


And distressed through it using Ranger Shaded Lilac, and pressed through some light and dark areas.  I thought it then needed some sparkle so foiled some Lavender Sparkle Medium and left that to dry for a short while.


In the meantime I stamped Indigo Blu Ella Bella using Versafine and Wow Clear Embossing Powder onto a fairly large piece of square paper, I wanted to shape this but wasn't sure how I was going to do that until the image was stamped. I decided to shape the corners of the card, distress the edges of the card with Lavender again and then back with black card.


Once the background card was dry, I decided to shape the corners as before but just back it with the black card.


 I then tapped some lilac ribbon in the centre of the card.


I added 3D Foam Tape to the back of the image and placed in the centre of the background card.


To finish I stamped a large and small flower head from the Clematis Elements Stamp Set, distress them then cut them out before shaping and gluing together.  I had some very thin lilac ribbon I cut into three little lengths and stuck them in the corner before placing the flower on top and adding a gem into the centre.  Done :o)


You can put any sentiment you like on this little card.  I hope you enjoyed it and thank you for dropping by today.

Lisa is taking bookings for the next two workshops at Grove Green. You can find the information about them HERE and there are still places on the July classes, information HERE.

Love Jan -x-