Showing posts with label stamping. Show all posts

Wednesday, 8 November 2017

Jofy Christmas Card.........

Good afternoon all,

This post is a bit later than planned but you know me!!!!

Well I haven't been that great this past week as I came down with a cold that seems to be going around and the virus has really affected my fibro and it has been so painful but hopefully I will kick the cold soon and feel a little better. There are a lot worse off people in this world, that's what I keep telling myself!

Anyway enough of my babble.........and onto the crafting...... 

I thought that I would show you today a card that I made using one of the fabulous new stamps from Jo Firth Young. I just love Jo's designs, they are right up my street and I love the contemporary look of them.

The stamp set that I used was JOFY 56, I also added another stamp on the corners of the card from JOFY 55. I find these two stamps sets really work together but then I often find that with Jo's designs.


Image result for JOFY56Image result for jofy 55  


So this was quite a quick and simple make.......
On a 5.5" square of watercolour card I stamped the main image of the baubles from set JOFY 56 to the left hand top side of the card with Versamark Black Onyx. 
I then stamped the message from the same set on to the bottom right of the card. At this point I felt it needed some corner pieces, so I took the sort of shooting star stamp from set JOFY 55 and stamped it twice on each corner as shown going in opposite directions. 
I wanted to 3d some of the main bauble image so I stamped it again on a piece of spare watercolour card.

Then it was time to set about colouring.......

I used watercolour pens to colour in the images.
Once all the images were coloured I cut out a star and a noel tag from the spare piece that I stamped and added some 3d foam to the back of them and attached them to the card.

I wanted to add in some background but still keep the cleanness of it so decided to add some watercolour splatters with my paint brush and Distress Oxides.

Then to add some detail I used a gold marker pen to add in detail to the bauble top and the twine as you can see below. I also edged the outer of the square with a gold pen and then matted it on to yellow and then black card before attaching it to my card front.


 The last detail that I wanted to add to the card was some shine and glitter, so I used Glossy Accents on the bauble and all other areas that I had coloured red. I decided to add a touch of gold Glamour Dust glitter just to the left hand side off the bauble to add an extra glow to it and voila, I was done.


Well that is all from me for now, I will be back with you next week. 

Not long now before the Christmas Workshop in Grove Green and we're down to the last couple of places. Click for details and booking information. 

Have a great week
Hugs, Lisa B xx


Gift Vouchers Available 
lisabdesigns@btinternet.com/01622675078

VersaFine Onyx Black     Fossilized Amber Distress Oxide   Fired Brick Distress Oxide   


Mini Glossy Accents

Wednesday, 1 November 2017

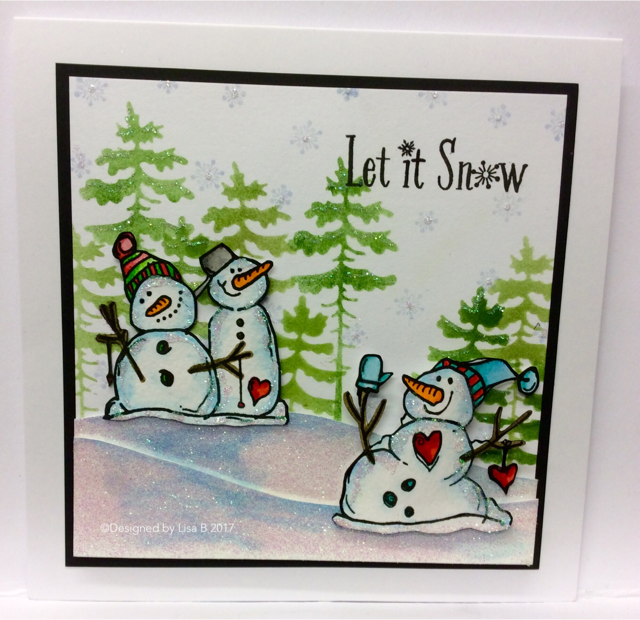
November Snowmen Class Cards.....

Good evening all......

Apologies for the lateness of this post but you know what they say......better late than never!

I have had a rather exciting week so far, a little different from the one planned but never the less all good. I got called in to help out at my sister's yesterday as my beautiful niece Heidi had her second child yesterday and we welcomed in to the world a gorgeous baby boy to our family weighing in at a hefty 9lb 3oz, no wonder she was exhausted by the end of the pregnancy. He is so lovely and I can't wait for another cuddle! So hence no blog post was wrote up and scheduled last night ( see I did have a good excuse! )

Anyway, enough of my news and back to the crafting........

These are the two variations of cards that I made for last Fridays Craft Class at Fant Hall. Now apologies again as I didn't realise that this would be such a popular subject and although I bought a lot of stock in, we sold out of nearly all of it at the classes and as I only have the Christmas Party Classes left I won't be restocking these but at least you get to see the ideas here on the blog.

So........I don't know about you but I love snowmen, I always have even from a small child and these gorgeous Woodware Stamps were right up my street and inspired me so much. I really love the different characters of them all. I also used a lovely Snowflakes stamp set from Hobby Art.


Here are the stamp sets that I used pictured below........


Image result for woodware snowman family

Image result for Hobby Art Snowflakes

The trees in the background were done by inking through the waste from Joy Crafts Happy Holidays Pine Trees dies. I used Distress inks in two different greens to add a contrast to them. I stamped some tiny snowflakes with Versacolor Baby Blue on to the background too.

The foreground was made by cutting two pieces of watercolour card into opposite mound shapes and then adding some colour with a blue watercolour pen. I then adhered some double sided sticky film to the coloured side of the mounds, trimmed off the excess and then pulled off the other side to reveal the sticky side and added loose fine glitter to the mounds. Little tip: If you burnish them ( rub them hard )  with your finger it will show the colour through more.

I then stamped my snowmen on to watercolour card with Black Onyx Versafine ink  and the coloured in the snowmen with watercolour pens and cut them out. I attached the mounds and the snowmen to the background, matted it with black card and attached it to my card and then finished odd with a little more glue pen and glitter.

The great things is with these snowmen that you can chose how many you want to use and make different scenes with them as you can see below......


The second card that I designed was made in a similar war but I used a Stampendous Snow globe stamp as the O in the word snow.

Related image

The circle of the globe was coloured in the same way as the first card and again covered with double sided sticky film and then glittered in the same way, The background was made using the Snowflake stamp set and Distress Inks and Versacolors. I used a set of alphabet dies from my stash to cut the letters out.


You can change the look of the card by choosing different colours......


Well that is all from me for today, I am going to put my feet up and have a cuppa.
Have a great week and I will be back soon with some more makes....

Big hugs
 Lisa B xxx
  
Double Sided Adhesive Sheets A4Diamond Frost Aurora SparkleVersaFine Onyx Black

Mowed Lawn - Mini   Bundled Sage - Mini  Versacolor Baby Blue    

Wednesday, 12 April 2017

Class Cards with Woodware Stamps and Infusions......

Good evening my lovelies,

Apologies for the late hour of this posting but better late than never, eh!
Wow, it has been a crazy busy week for me and I came down with the horrible cold virus that is going around and sinusitis last week, so to say it has been a tough week or so is putting it mildly!!!

I am very busy making samples and demos for my next Hochanda shows for Imagination Crafts at 8am, 2pm and 6pm on Saturday. I am doing another mixed media show with our lovely Canvas Journals/Planners, new large Mixed Media Stencils, gorgeous new Texture Stamps and also cards using our lovely products. Heads up, shh hush, look out for the Gold Gilt with the Mixed Media Sprays its won't hand around for long its goooorgeous!
I am covering a range of products and going to get inky and messy as usual but also have some clean and fresh cards planned for you, even a man's card!... lets hope the stock stays around long enough!


So on to what was meant to be this morning's blog post....... 

Below are the cards that my ladies created at my class workshop last Friday. We used the gorgeous NEW floral Woodware Stamps that were launched at Stitches in February and the fabulous PaperArtsy Infusions. I never thought that I needed Infusions as I love my Brushos but Kirsten persuaded me to give them a go and now I am hooked. I still love my brushos but Infusions give you a totally different look. They have ground walnut added to them so you get a really vintage effect with them, I just love it.........

There are quite a few photos to this post, so I am going to just list the items used as they are quite self explanatory and will go in to more depth next week, when I have a little more time.......


Items used:


You can see the lovely sparkle from the gilding flakes in the Starlights on this close up.....


Items used:


Die cut circles from my stash


Everyone made a version of their own based around these cards and you can see some of the class cards in a lovely album that Kirsten made on Lisa B Designs Facebook Page here ......

The second class card was made using one of the lovely Sheena texture dies to cut a textured aperture in the white card and we used the lovely Lily Stamp from Designs by Georgina and a Crealie Decorette No 17 Intertwined Circles die.


They had a choice of Infusions colour and used similar mediums as the above cards to colour the flowers and elements......


Well, it is short and sweet from me for tonight as I am getting so tired now. I have been in my craft studio since 9.30am this morning and need a rest now. So I am going to say goodnight for now and hope you enjoyed taking a look at the class cards. 

Big hugs 
Lisa B xxx


Wednesday, 28 October 2015

Cardio Wreath Card.......


Good morning all,

Apologies for the lateness of this post, I have been so busy in my studio lately making samples for my next class, Hobby Art and Imagination Crafts next TV shows and also for the Birmingham NEC show which I will be demonstrating at with Imagination Crafts that I totally forgot about my blog post last night....naughty me, hand slapped and all!!

So here is another sample card made using the wonderful Card-io Stamps, I know I keep saying it but I really have loved playing with these stamps. There are endless possibilities with them and I just love the scale of them......
I wanted to create a scene through a wreath so I chose to use the Card-io Fern Wreath and 


I started by cutting a 6"square piece of super smooth card and stamping the circle of ferns in Mowed Lawn Distress Ink, I repeated again moving the wreath stamp on a little to make the wreath look fuller. I then cut a circle to create an aperture in copy paper using my Spellbinder dies that fitted the size of the inner circle of the wreath and used this as a mask.
I began by stamping the the house first in Black Stazon and then made a mask from Mask-it to cover it. I then added some hills using my mylar hill mask (used in previous posts this month) and Shaded Lilac Distress Ink and also the sky line. Next I added in the fence with the trees and the lastly the deer.
Now at this point I was quite pleased with the scene but it looked a little stark against the green wreath so I decided to add some black stamping to the wreath too, so I added a first generation impression and then moved it on slightly and then did a second generation. This just helped pull the picture all together, you know what it is like sometimes you just don't know until you start playing!!

I wanted to add a sentiment, so I chose the Stampendous Merry Christmas, I love the script of this stamp, it is so flowing.......I stamped it in Black Stazon.

I sat and looked at the image and liked the cleanness of the card but because it was going on a 
white 8" x 8"card I felt it needed something else, so I opted for some snow flakes from the lovely Hobby Art Winter's Snowflakes Stamp Set (another favourite of mine):


So I used the cluster of small snowflakes at the bottom of the stamp set and my Shaded Lilac Distress Ink and stamped some around the edges of the card. I then matted and layered it on to black card and then on my white card......

To finish off I added some bling on to the hills with a Zig 2- Way Glue Pen and some Stampendous Crystal Glitter......


 Well I hope that you have enjoyed the inspiration and remember the blog challenge runs until November 8th. The theme is 'Stamped Christmas Scenes' & you get a second entry if you use Card-io stamps on your project, so why not have a go.....

Until next time......
Big hugs 
Lisa B xxx

Mowed Lawn - Mini   Shaded Lilac - Mini   ZIG 2-way Glue Pen  Crystal Glitter

Merry Christmas Retro Script   Stazon Jet Black  Mask-It

Wednesday, 14 October 2015

Blue Cardio Christmas......


Good morning all,

I do hope that you are wrapped up warm, I am not enjoying this sudden change of temperature. My bones really don't like it at all!!

I have been so busy of late still sorting out my late mum's affairs with my family and also updating the website and of course planning new workshop's that I have not had a lot of time to spend on social network so I apologise for that. 

#Note to self:  I must try to make more time this week.......

Today I thought that I would show you a couple of cards that I made using the lovely Christmas Cardio Combination Clear Stamps.

I love blue and white at Christmas with some added bling and the black silhouette stamps make them look quite stunning. The stamp set that I used for the first card is 'Christmas Scenery 1' which I have just a couple left in stock on the website. These stamps keep selling out so fast that I cannot keep up with them!!


I first began by cutting a panel to go across my card from super smooth card. I also cut a matting layer from Black Card as I knew I would be silhouette stamping with black ink.
I created a mound template by drawing a mound shape on a sheet of mylar (what stencils/masks are made from) and cutting it out with scissors. This way I can clean the mound as I go with a baby wipe and remove the ink and it is always reusable.

First I cut a circle from Mask-it to create a moon and peeled off the backing and stuck my moon in place as shown. I added some mounds on to the panel using Stormy Sky Distress Ink and a Mini Blending Tool, using the mylar mound stencil as a guide. I created the sky in the same way, removed the mask and then added slight shading to the moon.

I then started to add my silhouette images using the Christmas Scenery 1 stamp set and Jet Black Stazon, I use this as it dries really quickly and I can then move on.
I stamped the Noel message from the Pointy Baubles Stamp Set.

I then wanted to add the effect of snow so I took a little of my Distress Ink on my craft mat and added a spray of water. I loaded my paint brush and then splattered it on to the picture. Once dry I used a white pen to add highlights to the snow splatters.

Lastly I added some bling with a Quickie Glue Pen and Crystal Glitter......


The next card was created in the same way using two of the trees and the small groups of people and birds from the stamp set
Winter Walks.......


Once I added the finished panel to the card, I felt it was a little too bare. I really liked the clean look of the card but it was on a bigger 7" x 7" card so I decide to add a sentiment from Christmas Sentiments Stamp Set on to the bottom left.
Then I had a thought and grabbed my Hobby Art Winter Snowflakes Stamp Set out and using the Stormy Sky Distress Ink I added some stamped snowflakes.
Lastly again I added some bling to it as I did on the previous card........
A little closer look.......

Well that is all from me for now my lovelies, I hope that has given you a little icy inspiration!

Are you making your Christmas cards yet?

Remember if you're inspired to create your own Christmas scene, you can enter two projects into the blog challenge - if you use Card-io stamps you will get a second entry.

 Until next time.....

Big hugs Lisa B xx

Christmas Sentiments  Winter's Snowflakes       Mini Ink Blending Tool

Black Card    Quickie Glue Pen Crystal Glitter   Stazon Jet Black