Thursday 31 August 2017

A Card-io 'Wild' Garden Card


Good morning all, Martina here with my last Card-io card following last month's classes. How strange has the weather been? On Monday I was sweltering in a summer dress whilst inflating paddling pools and now I am sitting in bed socks with a dressing gown on (what a vision!!). 

Today's post is a quick one from me, although the card itself took a little longer to make than it should, due to a mistake or two along the way (it was late at night!!)

So, I knew I wanted to make a scene, and this time not a 'pretty, pretty' one. I am not sure about you, but my garden is not always a picture postcard, very often my flowers include some of the 'wild and free' varieties. Inspired by this, I wanted an everyday scene, more realistic, you might say!

My first step was to have a play with some stamps and copy paper. I wanted to experiment with the washing line stamp which is on the Perfect Patch Set, as I had not really used it. I tried different angles and colours until I had an idea with which to run with.


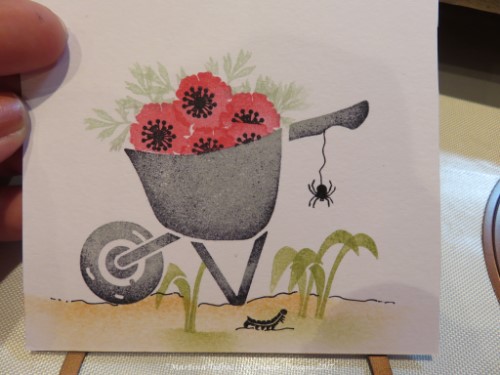
I started to build my scene, adding my washing line and then a wheelbarrow. I used Versacolor Cement and Black Ink for this, with Bark and Black for the washing line. I wanted to add some pots, so I used two of the ones from the Posh Pots Set and stamped with Topaz and Bark this time, masking one to stamp the other behind.
STOP!
Can you see my whoops? Obvious, isn't it? Poo (and all those other words, followed by a biscuit break, or 10). I appear to have balancing, floating, weird-ish pot problems. You just can't get the staff. Be honest: have you done it though?
I did try to save it, but made it worse, so in the bin it went and I started again, dear readers.


Slightly better this time - I repeated the first stage and then readjusted my pot composition. I used a stamp press to repeat stamp the flowers from the Backyard Blooms Set and colour each part with various Versacolor Inks as I went. I made a mask for the wheelbarrow, which allowed me to stamp foliage around it. The hills were made with torn paper and little brown ink to give a bit of 'grounding' to my scene.


Final touches - some bugs from the Backyard Blooms Set, a little pen detail with a fine liner, some Distress Ink around the edges to bring the eye in and some dashes along the edges. Voila!


So there we have it: there are flowers in even the most ramshackle garden, even if they are wild ones!
That's it from me this week,
love
Martina
xxx

Card-io Collection Perfect Patch    Card-io Collection Posh Pots Card-io Collection Backyard Blooms Versacolor Black Versacolor TopazVersacolor Violet

Wednesday 30 August 2017

September Newsletter

Hi everyone, I hope you had a great weekend, hasn't the weather been gorgeous? I'ved loved every minute of it. It's back to work now though, with all the prep to be done for Friday's classes in Maidstone and the new PaperArtsy workshop the following Saturday, Sept 9 in Grove Green.


The theme for Friday's classes is Christmas and this morning I added all the new Christmas stock to the website. There are some really nice Christmas cutting dies by Marianne Designs, Leane Creatief and Joy Crafts and two sets of layering stamps by Nellie Snellen...............


Last week I added more PaperArtsy stamp sets, including some very cute monsters and sets that are ideal for boys.............


As always, all the new stock can be found in the What's New section.

If you're coming to one of Friday's classes and you'd like to order goods in advance, please do so before lunchtime on Thursday, Aug 31.


The projects for Friday's classes will be two Christmas cards, using some of the news cutting dies and stamps, sneak peeks below.........


For those attending Friday's classes, we will be using Versa Color and Distress inks, you're more than welcome to bring and use your own to save you having to wait for colours. You might also like to being an Onyx Black Versafine/Jet Black Archival ink pad and a Christmas message stamp, if you have one you particularly like. 
***Please ensure your items are clearly marked with your name.***

 
If you would like to join us in Fant Lane Community Hall, Maidstone ME16 8NN on Friday, there a couple of places left in both classes; 2.30 - 5.30pm and 6.30 - 9.30pm. The class fee is £16 and this includes your projects, a tool kit to use during the class and tea/coffee and a slice of cake. Places must be booked in advance; a deposit of £6, or full payment, will secure your place. Please contact me by lunchtime on Thursday August 31; lisabaker1@btinternet.com/01622 675078

 
There are still a few places available on the PaperArtsy workshop and on Friday I will be taking bookings for the Christmas workshop on November 12, the project will be at the classes. There is a workshop on October 15, it will be based on techniques using Rusty Patina and I will have project images available soon. 

 
The next classes in Fant Hall will be on October 27, NOT October 6.

 
I will be demonstrating for Imagination Crafts at the Hobbycrafts show in Exeter between September and 24, if you're attending the show please stop by and say hello, we'd love to see you.

 
That's all my news for now, I hope you have a great September and thank you for your continued support.
 
Lisa B xx

Friday 25 August 2017

Card-io Alfresco

Hi there crafter, I hope all is well with you.
 
It's been a very trying month for me so far but it's getting better :o)
 
So today's little card is using the Card-io stamps and the Versacolor ink pads, I think they complement each other so well and I love using them.
 
 
I took my usual 7" x 7" white card then cut a square of black card about 3/4" smaller then white for my main image just slightly smaller than the black.
 
I wanted to keep it in the same vein as Lisa's classes because I think the cards look so classy.
 
The first thing I did was to place my white card onto the Press to Impress keep it in place with the two of the little magnets then placed two of the hot air balloons from the Up, Up and Away Card-io set face down on the card, then also placed the table from the Card-io Alfresco set face down where I wanted to stamp them.  I brought the cover over to pick up the stamps ready for inking.
 
I inked up the balloons with Versacolor Cinnamon and Baby Blue then the table using Cement.


Next I lined up the umbrella pole this time inking with the Heliotrope.


 To add some extra shading on the table and umbrella, I took a fine tipped paint brush and painted in some areas directly from the ink pad, quite easy and very effective, although you can't really see it so well here, but it does look nice in real life :o)
 
Next I stamped the little clouds on to some Woodware Mask-it  and cut them out.  I then placed them on the top half of the card, over the balloons and various places, then masked off the bottom of the card.
 
Then I'd cut some Mylar into the shape of some hills and taped that into place and dabbed in some VersaColor Sage to create the hills, then moved the Mylar along for another little hill.  Again I used the paint brush technique here to create the shading.


I removed the Mylar and the masking tape and dabbed in some Versacolor Sky Blue to create the sky.
 
Next I stamped various flowers from the Summer Meadow set, any flowers will do here, using various colours from the Versa Color range and adding a sentiment.
 
To finish off the card, I thought I use a Micron Fineliner Pen to colour in the balloon baskets and draw a few dashes and dots around the card to make it pop a little.
 
Here's the card again :o)


I hope you like the little offering today and hope to see you again very soon.
 
Don't forget if you're free this coming Sunday and you fancy grabbing a crafting bargain, or three, then the Allington Community Association Family Fun Day is the place to be..................!


Thank you for dropping by the blog today.
Love Jan -x-


Thursday 24 August 2017

Card-io Stamps used to Create a Mini Jigsaw Card


Good morning all, Martina here with another Card-io card, building on last week's creation! I liked playing with little 'mini' scene compositions, so I thought I would make another one, this time stepping it up a gear...

I started by using a die as before, but this time one with loads of different little apertures already in it (you could easily do the same thing positioning and moving a die/dies repeatedly). Once I had cut the die, I kept the outside paper (or waste) to use as a stencil. I used this with some Tumbled Glass Distress Ink to lightly add a background to the small 'scene' areas.


With my outline in place, I used sticky notes to mask each area, composing the card as I went along. I used the following Card-io Sets:

They were all stamped with various Versacolor Inks from my stash.


To create a more defined edge, I used a Black Micron Pen around each section. For the finishing touch I used a sentiment from an old Card-io set in my stash. The spider web was added out of necessity - to hide an inky finger mark!!


Some matting and layering to enhance the colours and the card was done. On reflection, I think the sentiment was too large and I should have chosen something smaller, but never mind, there's always next time!


Versacolor Violet Versacolor Sage Card-io Collection Backyard Blooms Micron Fineliners Pk of 3 Card-io Collection Perfect Patch Card-io Collection Pleasant Pastures Card-io Majestix Summer Meadow

If you're free this coming Sunday and you fancy grabbing a crafting bargain, or three, then the Allington Community Association Family Fun Day is the place to be..................!


I will see you next week for another Card-io make!

Love,
Martina
xxx


Thursday 17 August 2017

Card-io Stamps Used to Create a Mini-Scene Card


Good morning all, Martina here with another take on some of the newest releases from Card-io. Firstly though, how are you? Counting down till tomorrow home-time and the weekend? Needing inspiration? or, like me, trying to survive the school holidays with the kids? Whatever you're doing, I hope while you're reading my post today you can take a couple of minutes out...

So, I have no idea where the idea for this card came from. I just had one of those times when blank space seems intimidating. Do you get those? I usually find that the best solution is either:
1) start adding colour and create a background;
2) Sort through my craft stash until something grabs me;
3) Sort through my craft stash and think of lots of ideas which then morph into a muddle;
4) Stare at the wall and think whilst getting tea and biscuits (chocolate Hobnobs are preferred);
5) Start making the blank space smaller by dividing in up into smaller ones to fill instead of one large one.

This time, after starting with number 4, I progressed onto number 5 (thank goodness!). I decided that I would have some small 'apertures' in the front of my card with some small 'scenes' inside them. That way, I only needed to create small compositions and not one big one!

I wanted to work with different sized apertures, so I grabbed some of my basic circle dies to design my layout. I now had the sizes I needed and was able to plan the insides.


For my main aperture, I wanted to use the lovely wheelbarrow stamp from the Card-io Perfect Patch Stamp Set. I used a Stamp Press to stamp it on to some card, first using Cement Versacolor Ink and then Black to create depth/shading.


Once the wheelbarrow was complete, I stamped it again on some sticky note paper to create a mask.


Placing the mask over my original, I stamped the large poppy from the Card-io Summer Meadow Set using Cardinal Versacolor Ink. I used Black for the poppy centres.


To add foliage, I used the leaf stamp with Sage Versacolor Ink from the same set.


To ground the wheelbarrow, I tore some paper and used it to give me a base. Using Topaz Versacolor Ink and Potting Soil Archival Ink, I lightly rubbed some colour under the paper.


To add some interest to the scene, I used some bugs and a plant from the Backyard Blooms Card-io Set. 


Now for my next scene, I wanted to use the wellies from the Card-io Perfect Patch Set. I stamped them with Bamboo and Green Tea Versacolor Ink, adding the red detail with a pen. I added the soil and a bug as before.


To add some interest to the apertures themselves I decided to enhance the edges with a Black Micron Pen, some dashes and a bug or two! To make sure the dashes were even, I replaced the dies into the holes and used them as a stencil.


I created my last little 'scene' with the Pleasant Pastures Card-io Set and placed them all behind my topper panel. I only wanted a small sentiment, so I chose one from the Hobby Art Birthday Set.


Some matting and layering to bring out some of the colours used and the card was done (apologies for the lighting in the photo).


Thank you for joining me and my musings this week, I may see some of you on Sunday for Lisa's workshop? 
Lots of love
Martina
xxx

Birthday Collection HACard-io Collection Perfect Patch Card-io Collection Pleasant Pastures Card-io Collection Backyard Blooms Card-io Majestix Summer Meadow Versacolor Black Versacolor Cement Versacolor Sage Micron Fineliners Pk of 3