
Have we all recovered from an excess of food and laughter after the party last week? Calorie limit exceeded for this year and next? Good!
So, we are well and truly in the Christmas flow now, and with decorations going up for most people this week and last, I have decorated a couple of baubles for you...
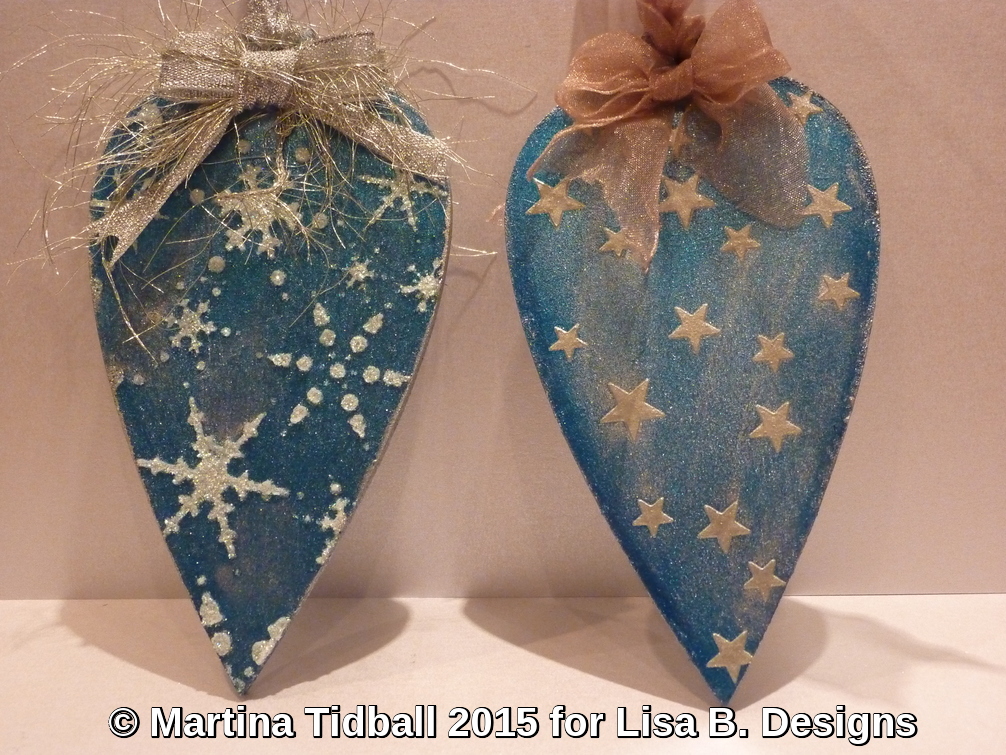
It would not be right not to have some sparkle, so I have used some Imagination Crafts Starlight Paint to create a vibrant colour for my bauble bases. My colour of choice is 'blue' in this instance, and although you can easily mix the Starlight colours to create different tones, I have left the pure colour as it is such a lovely 'kingfisher' hue. I only needed to use one coat of paint on my MDF and no base gesso layer, as the paint is quite highly pigmented (if you use a very light colour on the MDF you may want two coats to get the true colour).

The paint does not take much time to dry at all and once both sides are painted it's time to decorate... For the first bauble, I used Imagination Crafts Sparkle Medium in Diamond (one of my FAVOURITE all time products!!). My medium was a little old and had gone quite thick, but it still spread really well and gave lovely raised finish! I used and Imagination Crafts Snowflakes Stencil and a palette knife to spread the medium, choosing the part of the stencil that I liked the best. I did not tape it down, just held it steady and then spread with the other hand. Tip: if you do make a whoops...just wipe the paste off and start again, its wipes off the dry Starlight Paint easily...trust me!

Once one side was dry (I left overnight) I then did the other side (as it will be a hanging ornament). The Sparkle Medium is very robust when dry, so don't panic, you won't squash it and the glitter won't shed everywhere!

For my second bauble, I started in exactly the same way with the same Blue Starlight Paint, covering both sides. This time however, I wanted to have a play with using Sweet Poppy Dimension Paste and mix it with Starlights to change the colour and match some embellishments I also wanted to create. My first step was to take a small amount of Pearlescent Dimension Paste from the main pot and put into a craft sheet (Heat Resistant Mat is the proper term!) ( a mixing palette would also be fine to use, or a spare pot if you want to keep some made-up colour). I then took a smaller amount of Platinum Starlight Paint and mixed the two together until I was happy with the colour - voila! You have dimensional paste in any colour you like...oh, the possibilities!

Once I was happy with my colour, I used a TCW star stencil that I had in my stash and spread the coloured paste in the same way as the Sparkle Medium.

Leaving overnight again, I pasted both sides and achieved a lovely raised textured finish with the tint of the Starlight colour.

For my next step, I wanted to 'distress' my bauble, as it was looking too 'perfect' for me... I used some Silver Inka Gold applied sparingly with my finger on the edges and across the front and back.

The final touches were some ribbons from my stash for both baubles, and some painted die-cuts. For the snowflake bauble I have die-cut a tag and painted with Platinum Starlight Paint. I have then stamped a sentiment from my stash using Jet Black Staz On. For the star bauble I have die-cut some chipboard letters, again painted with Platinum Starlight Paint (to match my stars) and applied to my bauble with a glue gun. Some pearls to finish and all done!

See you next week; thank you for reading!
Lots of love
Martina
XX


Beautiful decorations Martina, great idea too, love it :o) x
ReplyDeleteThese are gorgeous, love the sparkle.
ReplyDeleteLovely baubles honey xx
ReplyDelete