Good morning all! I really need to get some Christmas cards done; why oh why are they always left to the last minute in my house?
This week I decided to team some Starlight paint with some Sweet Poppy Pearlescent Dimensional Paste. I love glitter card, but it is a little too much for me when used in large chunks, so the Starlights allow me to create a background that sparkles in a more subtle way, that I can still stamp onto AND use other products on top of!
Off we go then...
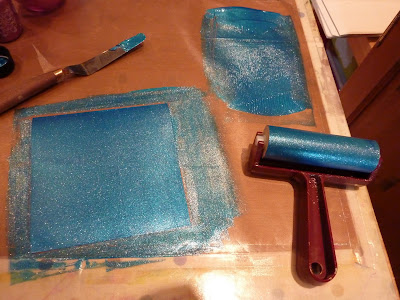
My first step was to use a palette knife to put a small amount of Blue Starlight Paint onto a Heat Resistant Craft Sheet (you can use any wipeable craft mat). I then used a brayer to pull the paint downwards and evenly spread the paint. Once my brayer was coated, I then transferred the paint onto a section of Super Smooth Card cut to fit a small square card (5x5 size card blank). The brayer gives a great coverage of the paint making it even; you can really see the sparkle! Tip: if you have any paint left that you're not going to use, use the palette knife and put it back in your pot. Or, you can do what I did and brayer another piece of card...
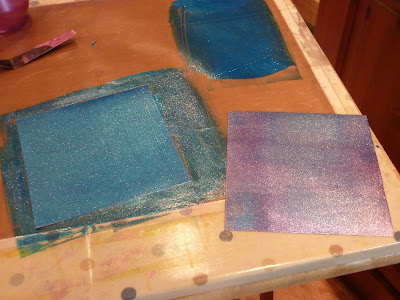
Above you can see my original Blue Starlight Paint card brayered on the left, and then on the right you can see the same card with Cyclamen Starlight Paint brayered on top for a slightly different effect. I like the mixed look, and you always get a fab. effect as all the colours work so well together and blend beautifully.
Back to my card now.. It's really difficult to see in the image above, but once the paint was totally dry I used some snowflake stamps from the Hobby Art Winter's Snowflakes set and randomly stamped them all over the panel using Jet Black Staz On. I then chose a metal stencil from Sweet Poppy and fiddled with the positioning (applying some Masking Tape to certain areas) until I found the sections that I wanted to use.
Placing the stencil over my card, I used some Sweet Poppy Pearlescent Dimensional Paste and dragged this over the area using a Spreader tool. After lifting the stencil straight away and placing in water, I let my panel completely dry.
My final step was to stamp an image from the Card-io Christmas Sentiments set onto some card and colour in the text using a Salty Ocean Distress Marker (which works well with the blue paint). This was added to my card using foam tape for some height.
Easy to do once you've done one, so quite achievable for Christmas card batch making do you think?
Thank you for your company,
Love
Martina
xx


A fab, contemporary Christmas card, I love it.
ReplyDeleteBeautiful card. Thank you for the tips and loving the dimensional paste of the background, works really well x
ReplyDeleteStunning card Martina........I love it :o) xx
ReplyDeleteLoving this card honey, so sparkly xx
ReplyDelete