Monday, 29 June 2015

Pearlescent Sweet Poppy


Good morning, I hope everyone had a nice weekend, it was great to have some proper heat & sunshine. Today's projects are my final two for our Sweet Poppy month, I used the Fairy Pods & Tree of Hope stencils, along with Pearlescent Dimension Paste & Brusho crystals.

I created a simple background using the Doodle Squares stencil (back in stock soon) & various Distress inks, then mixed Turquoise Brusho with the Pearlescent paste & applied it through the Fairy Pods stencil. Finished the card with black card & matching Core'dinations card.............


I had some of the paste left over so I applied it though the 
Pronty Fishscale stencil onto black card & when it was dry, applied 
Glossy Black Dimension paste through the Tree of Hope stencil. I added a sentiment from the Stampendous Life Words stamp set & a length of ribbon & as before, matting & layering with black card & matching Core'dinations card.......... 


Fairy Pods  Tree of Hope  Dimension Paste - Pearlescent   Dimension Paste - Glossy Black   Brusho Crystal Colours - Starter Pk 2 Pk of 24  Creative Expressions  Fishscale  Life Words

This coming Friday sees the Inka Gold workshop happening in Maidstone. For further information, see this blog post - I have added some additional information, so those who are already booked to attend might want to check it out too.
 There are a very few places left, so please contact Lisa - lisabaker1@btinternet.com - if you're interested in attending. 

Saturday sees the end of the Sweet Poppy blog challenge. Entries have been surprisingly sparse, so we'd love to see a few more.

That is it from me for now, I hope to be back on Saturday with a review of Friday's workshop. Thanks for visiting the blog today & have a great week.

Kirsten

Friday, 26 June 2015

Sweet Poppy Teardrops


Hi there crafters, I hope everyone is doing ok.

I thought I'd have a go at the lovely Sweet Poppy Teardrop stencil by using the Soft Form relief paste in white and taking time over it by putting the glitter on with our new tool in the box the humble straw :o)

Sorry but the photo seems to be showing some of the Silver as Gold
 
It took some time and patience but here is what I did.  I placed some white card stock over a magnetic sheet then laid the stencil on it, then taped it down each side using the stencil tape.  I then spread the White Soft Form Relief Paste over the stencil then carefully removed the tape and stencil.  This is where the patience came in, I lined up the four glitters I wanted to use and randomly laid the glitter over each swirl, by starting with the black then moved onto the next colour and the next, you get my drift :o)

Here is the untidy bit of it:
 
Here's when it was dry:
 
 
I left that to one side to dry.  I then took a 7 x 7 card and matted with silver mirri card and cut a slightly smaller piece of white and placed a strip of double sided tape near the bottom of the card then covered that with Silver Gilding Flakes - Sheffield Steel.  I then distressed the stencilled image with Milled Lavender distress ink (Currently out of stock so Dusty Concord could be used instead)
 
You'll notice in photo above that some of the glitter bled into areas I didn't really want it to so I decided to do our favourite trick of hiding them with a butterfly.  Well I like it so much I thought I'd put on a few more in different colours to match the glitter.  So I used high gloss card in Black, Mauve, White and Silver and the Cheery Lyn Designs Exotic Butterfly Small (Sorry also out of stock, so you could use the butterfly charms stamp set and cut out the individual butterflies).
 
Here are the elements:
 
So to build I matted and layered the stencilled image with black then silver mirri card before placing it on mounting foam and positioning in the centre of the card between the silver gilding flakes strip and the top of the card.
 
I first placed the butterflies on the areas I wanted hidden then fitted the other butterflies around them.  Finishing off with my favourite bow the Sue Wilson Classic 3D Bow some silver card candi and one single butterfly in the top right hand corner.
 
Here a little close up of the image and the finished card again:
Sorry for the quality of the above photo.
 
 
Thank you so much for dropping by again..........see you next Friday here and hopefully at the class.
Love Jan -x-


Wednesday, 24 June 2015

Foiling with Sweet Poppy......


Morning all,

I do hope that you are all well and the weather is being good to you. I am still in Spain and this is another scheduled post from me.......

Today I thought that I would show you some cards that I made using Sweet Poppy Stencils and Mega Flakes with Double Sided Film.
The ingredients for the first one are:

Ultrafine Gold Glitter
Gold Mirri Card and Black Card

Cut a random shaped border out of the double sided film and then stick across your card, peel off the front and add the Yorkshire Dales Mega Flake and brush off excess with a stencil brush.
Then using the Sweet Poppy Black Glossy Paste and Dotty Flower stencil add the flower design over the top, making sure then stencil is as flat as possible ( I use a magnetic sheet underneath ). When dry add a message and a light edge with Black Soot Distress Ink.
I think this makes a really dramatic but classy card, what do you think?


This second card was created with the same ingredients in the same way but just using black card and added some glitter to the double sided film first before foiling, I also die cut the circles. The flowers were created the same but cut away and I decided to use just three of them and save the others for another project......

How different does this look, using the same ingredients but just changing a few things?? It is so great to test yourself and think out of the box!!!


I started to get on to a circle theme so I played around with a couple more.
This time I used:

Ultrafine Gold Glitter
Black Card

I die cut a white and black circle, using Black Soot Distress ink I added some background to the white circle using the Imagination Bubble Stencil. I then matted on to the black Circle and attached it to my card. As before I took some of the double sided adhesive and cut a mount shape and then added this along the bottom of the card as shown and also a black border.

I then removed the front of the film and added some gold ultrafine glitter using a straw cut off on an angle as you can control the addition of the glitter a lot easier. I then gilded the bottom of the film with gold flake and brushed of the excess.

On a separate piece of black card I used the Zen Thistles Stencil with Glossy Black Paste and left it to dry entirely. Once dry I put the stencil back on and used some IndigoBlu Flitter Glue on a piece of cut'n'dry foam to add some glue over the thistles. I then removed the stencil and added some areas of glitter to the thistles and then gilded the rest with the gold flake and brushed off the excess.
I then cut out the thistles and added them to the card. 
I really love the simple look of this card....... 


 I really liked the last card so decided to do another one using the Sweet Poppy Wishing Tree. I created it in the same way.....
Well let me know what you think of the foiling and whether it has inspired you to have a go?
Take care and have a fantastic week,
Big hugs Lisa B xx

Dotty Flowers  Zen Thistles   Wishing Tree  Mega-flake Chariot of Fire  Mega-flake Yorkshire Dales

Dimension Paste - Glossy Black  Glamour Dust - Gold   Bubble Background  Flitter Glue and KitsBlack Soot Distress Ink Pad

Monday, 22 June 2015

Sweet Poppy Canvases


Good morning, Kirsten here with two canvases to show you. I used Sweet Poppy stencils, (Mushroom Dwelling & Oriental Lily) & Dimension pastes, as well as Brusho Crystals, acrylic paint & Crackle medium on 20x20cm canvas boards.


I mixed purple Brusho with white dimension paste & scraped it onto the board with a palette knife, varying the depth of coverage & leaving gaps. I sprinkled a little more purple Brusho onto the wet paste & set the canvas aside to dry.

The next step was to fill in the white areas with washes of orange & yellow Brusho, drying in between to build up the colour. Once I was happy with that I applied Glossy Black paste through the Oriental Lily stencil & once again set the canvas aside to dry............


To finish the canvas I applied black gesso through the That Special Touch Splats stencil around the edge of the canvas & clear embossing ink through the Imagination Crafts Leaf Swirl stencil, topping with gold embossing powder & heat setting..................


This gives you an idea of how glossy the black dimensional paste is...........


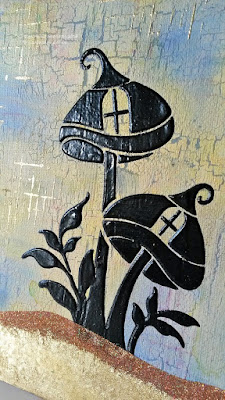
I painted the second canvas firstly with a grey-blue acrylic paint, applied Imagination Crafts' Crackle Medium on top, when that was dry I applied a wash of an off-white acrylic paint...........


I sprinkled on Ost Blue & Yellow Brusho crystals, spritzed the canvas with water to activate the colour in the crystals & repeated, adding & taking away colour until was I happy. When the Brusho colours had dried I added stenciling; 
Imagination Crafts' Honeycomb stencil, the Pronty Waves stencil & the TCW Sketch Grid stencil with Distress inks & Imagination Crafts' stencil paint in Rose, Royal Blue & Bluebell...............


 I applied the black paste though the Mushroom Dwelling stencil - because the canvas boards are thicker than card, you can't use a magnetic sheet underneath to hold the stencil in place, so you need to make sure you secure the stencil with plenty of masking tape.


This canvas then sat in my craft room until Lisa suggested I add some gold to it. I followed her idea for the class projects, using gold gilding flakes & copper glitter at the bottom & as with the first canvas, embossing ink through a stencil, this time The Crafter's Workshop Sketch Grid stencil, and gold embossing powder..........


Mushroom Dwelling  Oriental Lily  Dimension Paste - Glossy Black  Dimension Paste - Glossy White Tools Brusho Crystal Colours - Starter Pack of 12  Crackle Medium  Canvas Panels 20x20cm - Set of Two  Honeycomb  Wave 1  Splats   WC04 Metallic Gold Rich Emboss Ink Pads   Mega-flake Chariot of Fire  Bluebell   Rose  Royal Blue  A4 Double sided Adhesive Sheet

Thanks for visiting the blog today & happy crafting. See you next time.

Kirsten