
Hi there crafters..............Another in the Card-io stamp range for you today. This one has the layered look about it, with a little bit of bling and some little bells to give it that extra Christmassy feel.

So I started with a 7" x 7" card then cut three smaller pieces of white super smooth card as follows:
5.5" x 5.5"
4.5" x 4.5"
3.5" x 3.5"
Then cut some black card just slightly larger that the white squares.
I layered the white squares evenly on top of each other then stuck them in place using some removable tape just on the top, you can just about see the tape in this photo.

I then took the Card-io Christmas Scenery 1 and stamped the mountain range, twice, using Versafine Black Onyx, which I used throughout by the way. I decided where the street lamps, from Christmas Scenery 2 where going to go and used a dry wet wipe to apply a small amount of Squeezed Lemonade and Ripe Persimmon where the lamp head was going to be.

I stamped the lamps and continued with the larger of the two buildings from the Christmas Scenery 2, then the snowman last. Each time I stamped I ensured they spanned as many layers as possible.
I removed the tape from the squares and used an eraser to wipe away any residue tackiness the tape left behind, then mounted each square onto its corresponding black square. At this point I put the double sided tape on all the layers so once it was decorated I didn't have to worry about it. I carefully lined up the first square and made sure it all matched before removing all the tape from behind the card, I'm one of these crafters who only removes half the tape from each side and putting the layer into place before removing the remaining tape.
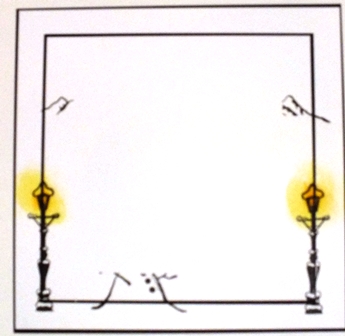
So sorry about the quality of this picture I hadn't realised it as was so bad until I uploaded it :o(
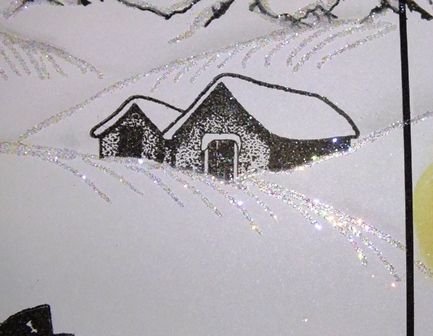
I continued with the next two layers before adding in some little snow dunes by using the handy template and the dry wet wipe and a very small amount of Black Soot Distress Ink to create the mounds. Then came the fun bit, I drew lines under the ink shadows using a quickie glue pen and then sprinkled Glamour Dust. I didn't spill any this week :o)
I took three little sleigh bell embellishments and tied them to some very thin white satin ribbon then poked a hole in the largest white square in the top right corner, secured it at the back with tape then covered the hole with a sparkly brad.
I placed the three layers onto the original card and stamped the word Jingle Bells from the Card-io Christmas Sentiment set on each side of the card then added some squiggly lines and finished with some card candi, however, I would have preferred to add some more bling from the new range on the website but haven't had the chance to get some yet.
Here's a close up so you can see the detail of the glittering and the card itself again :o)

I hope you enjoyed the card, see you again next Friday for a full tutorial.
Love Jan -x-


Very clever idea of the matting and so very effective. Great layout and loving the pop of colour from the lamps x
ReplyDeleteThis is lovely. The layers & the glitter loook great.
ReplyDeleteThanks for the lovely comments :o) x
ReplyDeleteGreat card Jan, I love the layering effect xx
ReplyDelete