
Good morning, I hope you all had a nice weekend. Many thanks to Lisa for filling in for me last Monday. My laptop still isn't right, but at least it's working most of the time. My project today is a
20 x 20cm canvas panel, I used Brusho Crystal colours, a Stampendous PenPattern Butterflies stamp & the coordinating die. There are a LOT of photos, so without further ado, let's begin......

These canvas panels come ready primed, but I always like to add an extra coat of white gesso. I wanted lots of texture, so I glued on pieces of white card with Mod Podge, (adding more Mod Podge on top, so that the wet colour wouldn't seep into the die cut pieces), die cut with a
Cheery Lynn Chickenwire Frame die, scraped on Soft Form Relief Paste in white & painted another layer of gesso on top to achieve a uniform shade of white......

Time to start sprinkling on the Brusho Crystals....
I usually begin with spraying a little water onto the surface of my project, then adding the crystals, others add the water first. Experiment & find what works for you. The most important piece of advice I can give you is...........
Be Patient!

Wait for the crystals to start reacting with the water before adding more of either. Also, limit yourself to two colours - one light, one dark - then decide if you need a third. Here I began with Orange, then Turquoise & finished with a tiny amount of Ultramarine.....

Try to use a spray bottle that has a fine mist & vary the distance from where you spray. I moved the panel, tilting it this way & that to get drips of colours & if there was too much colour in places, or they ran into each other too much, I used a piece of clean paper towel to mop up the excess........

I set the panel aside to dry naturally & when it was I unscrewed the top of a bottle of
Shimmer Yellow spray & flicked drops of liquid here & there..........
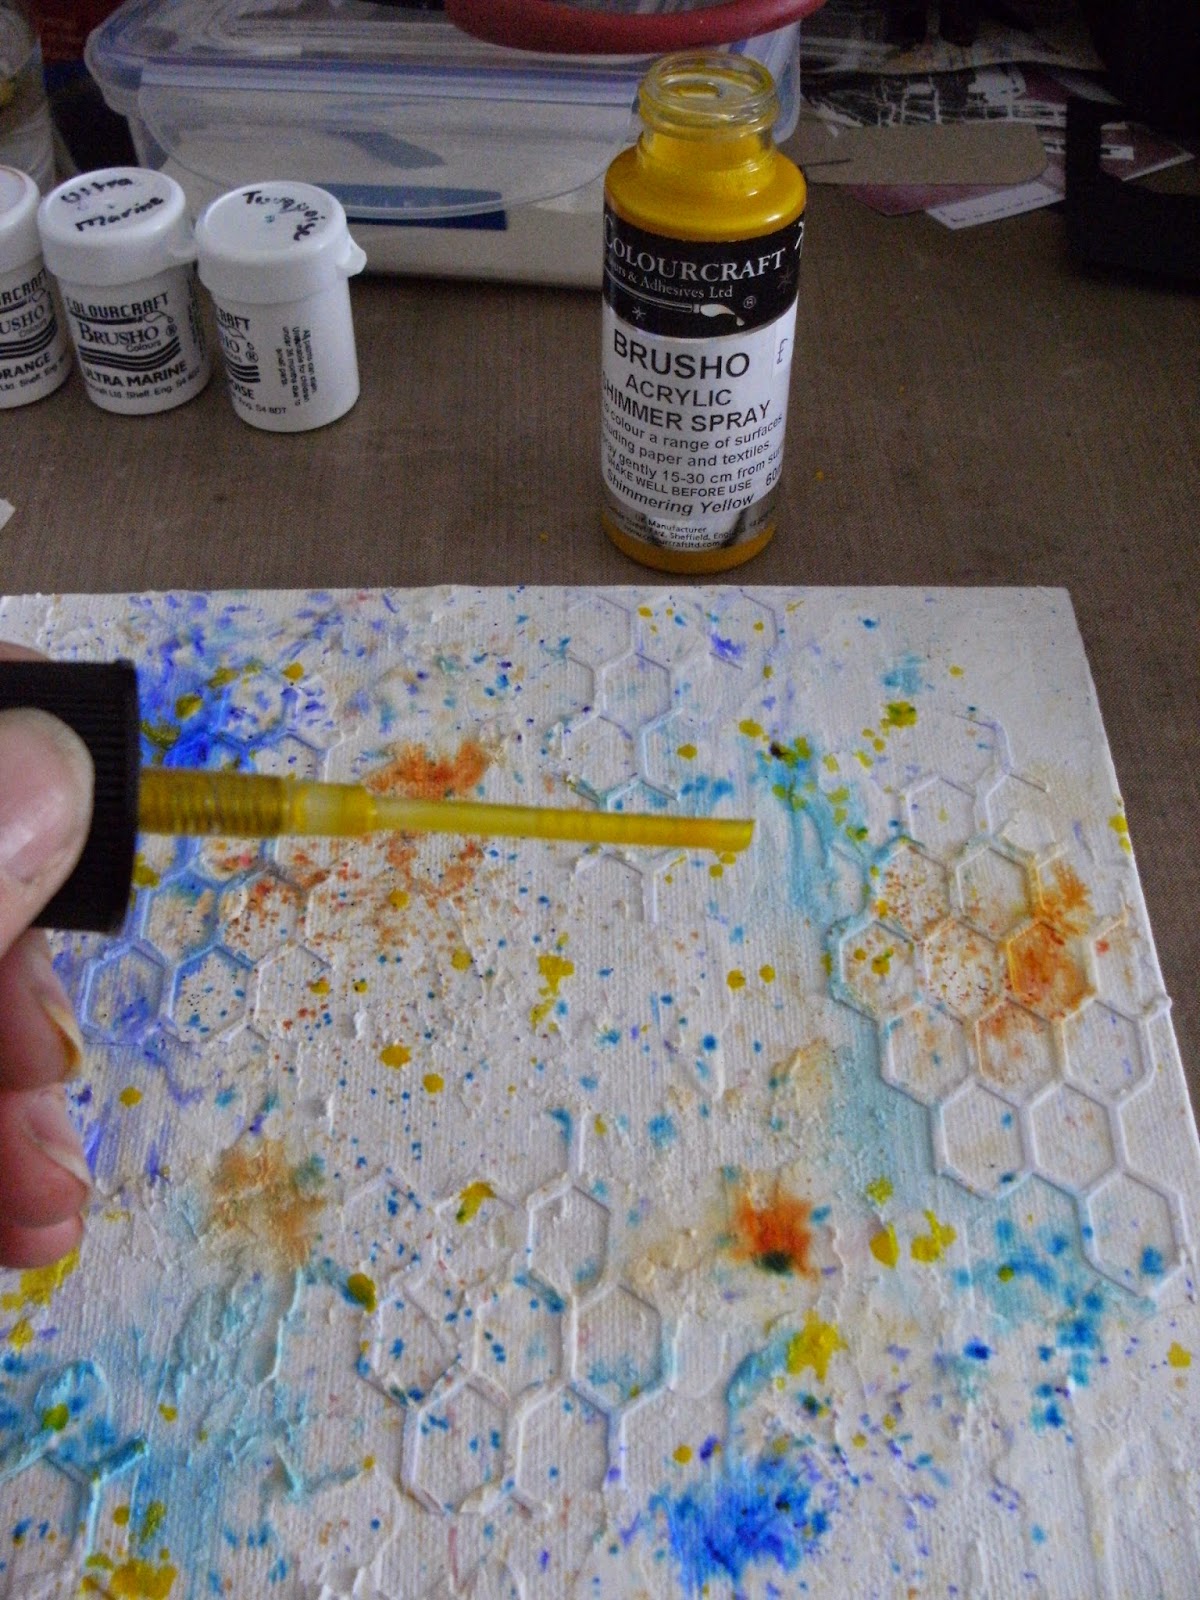
I LOVE these shimmer sprays. They've got lots of mica powder in them & the colours are just gorgeous.
The bottles have got a ball bearing inside to mix the mica into the liquid.
Make sure you give the bottle a good shake so that you can hear the ball bearing hitting the sides of the bottle. I hit the bottle against the side of my hand a few times before shaking it. I set the panel to one side to dry again........

Time for the butterfly. This is the largest of the three in the PenPattern Butterflies set. I stamped it onto Super Smooth white card with embossing ink, added Bright White embossing powder & heat set. Then I used the coordinating die & cut out the embossed shape......

On the smallest of my blending mats I mixed a tiny amount of Ultramarine crystals with a tiny amount of Shimmer Blue spray.........

Laid the die cut butterfly on top & pressed it gently into the liquid...........

I let the colour dry slightly, then repeated & set the butterfly aside........

Almost finished!
I stamped the Stampendous 'Live Creatively' stamp onto tissue paper with a Stazon Jet Black inkpad & gave it a quick blast with my heat tool - to prevent the ink bleeding into the tissue..........

I wanted the quote to look as if it were part of the canvas, not added on & the easiest way to do that is to tear the edges of the tissue paper - torn edges will 'disappear' into the background, whereas straight edges will draw the eye to them. And the easiest way to tear the edges of tissue paper? Water & a tapered paintbrush.
Paint a thin line of clean water along one side of the quote.........

Gently pull the fibres apart..........

Repeat until you've got a torn edge all the way round...........

(Don't use too much water, the tissue paper will dry in seconds)
Now you need to use a gel medium to adhere the tissue paper to the canvas. Usually I brush the gel medium - I used Mod Podge - onto the canvas, but I wanted to ensure the Brusho colour didn't run, so I brushed it onto the back of the tissue first.........

I placed it carefully onto the canvas & brushed another coat of Mod Podge on top, going over the edges slightly & rubbing very gently with my fingers to make sure it was fully sealed. When it was dry, you could hardly tell where the edges of the tissue paper were...........

And at last, it was time to put everything together........

(I didn't want foam pads to be seen under the butterfly, so I used hot glue for a little dimension & a piece of black card to frame the canvas)
If you're still with me, THANK YOU! This is a long blog post. I hope you like my canvas & maybe it will inspire you to have a play with your Brusho colours & then you can enter the new blog challenge, hint, hint!
I'm filling in for Lisa on Wednesday, so I shall see you then with more Brusho projects & hints & tips.
Kirsten
Beautiful!
ReplyDeletestunning work - will be trying this - its lovely xx
ReplyDeleteFab inspiration Kirsten, will gave a try at this myself...xx
ReplyDeleteI wondered how it would react on Gesso/texture paste, now I know! Lovely mixed media piece.
ReplyDeleteLove this Kirsten..the clours are gorgeous xx
ReplyDeleteThis is wonderful Kirsten, I love the textures, and thanks so much for the tip about being patient. You've made a fabulous piece here xx
ReplyDeleteI may be late catching up, but I'm so glad I did - this is stunning! How cool the ink effects are over the texture - wow.
ReplyDeleteAlison x
Thank you for the inspiration. I have learnt lots from this post, thank you so much. Love the final project x
ReplyDelete