Friday, 29 January 2016

Sweet Poppy & Lavinia

 
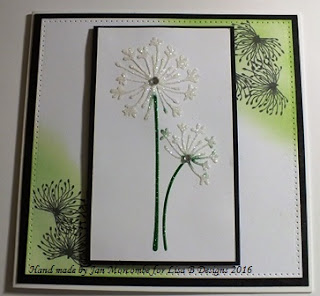
Hi there crafters, another favourite technique from 2015 for you, this time Sweet Poppy Stencils, Lavinia Stamps and Dimension Paste.
 
 
I took a 7" x 7" white card and matted it with black card, then die cut a 6.5" square white card using a beautiful die I had for Christmas from the Sue Wilson range.
 
I then cut a piece of white smooth card 3.5" x 5.75" and a piece of black card slightly larger to create a frame.  I wanted to use the Sweet Poppy Agapanthus Stencil, so laid the card onto a magnetic sheet and placed the stencil on top, because of the size of the cut card it fitted perfectly and made it easier to tape down using very low tack masking tape.
 
 
I spread the Sweet Poppy Translucent Dimension Paste across the top of the stencil and using the Sweet Poppy Spreader dragged the paste down over the stencil then took away the excess paste before gently removing the tape and lifting the stencil to reveal the image.  I moved the card to a difference craft mat so I could glitter it and then leave to dry without disturbing it.  I used a very fine green glitter for the stem and Crystal Glitter for the flower heads (sorry about the slight contamination, very shaky hands)
 
Whilst that was drying I went ahead and prepared the background for the card by stamping some Lavinia Stamps Dandelions heads only (I thought they matched the stencil well)  To get just the heads, I put the stamp as close to the edge of the acrylic block as possible,
 
 
 Then covered the stem with a little sellotape before inking.
 
 
Then removed the tape before stamping the image on the card. 
 
 
I repeated this several times in each corner of the card. 


I then thought it needed some colour so used Mowed Lawn Distress Ink and a Smoothie  (sorry out of at the moment but please keep popping back) and gently inked over each of the images until I was happy with the finish.


I matted the stencilled image onto the black card and mounted that with foam pads before placing it in the centre of the card, it does cover the stamped images a little but I think it's fine, gives it dimension.
 
Here's a close up and the card again.


Thank you for taking the time to visit the blog, see you again soon
Love Jan -x-


Thursday, 28 January 2016

Using Brushos and Gilding Flake to Illustrate a Beautiful Mind


Good morning all! How are we all? Not very good weather down here, wet and windy and the perfect excuse for hiding I'd say...
As we are reviewing techniques and products we have used through the year, I thought it would be the perfect excuse to use a stamp set I have owned for a while, but was not sure what to make with it. Do you have crafty items like that? You know, the ones you see, you buy because you LOVE them, but then can't think who to send cards to using them?? Guilty: several times over.

First step, 7X7 card blank base and 15x15cm piece of watercolour card. The watercolour card is the best to use for the techniques I used in this case, not only because of the fab texture, but also because it is 'forgiving' and allows you to play and 'alter' the colour you place onto it.

My next step was to select 3 colours of Brushos and apply small amounts directly from the pot onto the paper (less is more). Using a spray bottle with water, I then lightly sprayed onto the card, waited a few seconds and sprayed again if I wanted more 'spread'. Where the colours were intense, I used a muslin and dabbed away to leave a more subtle effect (purely personal choice here, but the watercolour card allows you to do this, if you try with anything else you will get a pulpy mess...)
Once dry, (you can speed up with a heat gun) I then took one of the stamps (chemical symbols) from the IndigoBlu Beautiful Mind stamp set and stamped across the whole topper, using the 2nd generation of ink from a Jet Black Staz-On pad. The effect is subtle, but I like it when you look at a card, then when you look again you see things you didn't realise were there at first...
 
 
Now, slightly different technique with the Brushos - this time putting a little of each of the colours I had used into a small palette and adding some water so that I could use them as a paint.

 
I stamped the head and the sentiments, again from the Indigo Blu Beautiful Mind stamp set, onto watercolour card, cut them out and painted them with the Brushos.

 
Going back to my main topper background, I used one of the stamps from the Indigo Blu Itsy Bitsy Backgrounds set (sooo useful this set!). I applied Versamark onto the stamp and stamped twice onto my topper at an angle. I then covered the area with Wow Bonding Powder and heated with a heat gun. Once this was 'tacky' I then covered the area with Indigo Blu Gilding Flakes and rubbed over. At this point I agree it looks a little 'alternative' (stay with me..!) but then, so are the stamps, aren't they?

 
Once I had mounted my elements onto some black card to make them pop, I also applied to my base with 3D glue gel (rounding the head especially). A final touch was needed, so I stamped a flower from Lisa B.'s Floral Pimpernel College onto watercolour card and coloured the same way as before, finishing with a pearl.

 
Not sure who I would send this one to; I would not want to offend anyone, but my goodness it does apply to me and I often have 'big problems'!
 
Really looking forward to seeing you all next week; it does seem an age since last class and it's great to have crafty chats together with other like-minded folk
 
Thank you for indulging me and reading,
lots of love,
 
Martina
xx
 
Watercolour CardBrusho Crystal Colours - Starter Pk 2 Pk of 24 Stazon Jet BlackBlack CardBeautiful MindWOODWARE SPRAY BOTTLES - PACK OF 2Itsy Bitsy BackgroundsVersamark Ink PadBrighton PierPimpernel CollagePetal Mixing PaletteWow Bonding Powder7x7 White Card Blanks & Envelopes


Wednesday, 27 January 2016

Back on Hochanda with Imagination Crafts......


Good morning lovelies......

How are we all today?
It is a little bit wet and windy here but at least there is no sign of the white stuff yet, I really hope we don't get any as I have a lot of travelling to do in the next month!

It is a very busy time of the year, not only am I getting ready to start my classes for the new year but we are also preparing for the annual spring NEC Trade Show as well as lots of TV programs on Hochanda. Sue and I are back on  ‪#‎Hochanda‬ this coming Friday, January 29th for three programmes; 11am, 2pm & 5pm, GMT.

 Sue will be doing a Sparkle Medium mini-masterclass, showing you various techniques, including die cutting & using Sparkle Medium in moulds.
 I will be demoing more techniques with Starlights, Sparkle Medium, MDF paints & the gorgeous rice papers, among others.
There will be new offers, including; another set of Starlights, a special offer on Sparkle Medium, a HALF... PRICE offer a set of BRAND NEW stencils & much more.
We have a lot to cram into three hours, so we hope you'll be able to tune in, or alternatively record the programmes.


Channel information:
Freesat 817 (24/7) Sky 663 (24/7) Freeview 39 (6am - 9pm)
Watch LIVE on www.hochanda.com

Here are some sneak peeks of some of the demos that I will be doing on the shows including up cycling old bottles using the gorgeous Vintage Rice Papers in the show, Mdf Paints, Starlights and Alchemy Waxes........


A beautiful vintage acetate layer card using the gorgeous rice papers
(I really love these) ....


A lovely Mdf wall hanging.....with added Sparkle Medium....
 
 
And of course our ever popular Mdf Boxes, these are such brilliant strong boxes that can be decorated so easily in many ways and used as a gift box or as storage boxes for your crafts. The Starlights fit inside them standing up, you can get nine pots of them in the box......


These are just a few of the demos we have planned for you and Sue and I will try our best to get as many demos in as possible as we know that you love to see what you can do with the products.
Well that is all from me for now peeps, I do hope that you can tune in or set your recorders, take care and have a lovely week.....
Hugs
Lisa B xxx

Sparkle Medium   Alchemy Waxes  Starlights Metallic Paints  


Monday, 25 January 2016

Brusho Colours & Glossy Black Dimension Paste


Morning all, here we are at the last Monday of January, the year is flying by already. I have another card from last year to show you. This time its a Brusho background with Sweet Poppy 
Glossy Black dimension paste applied through a That Special Touch Poppies stencil...........


The Brusho crystals were sprinkled randomly onto watercolour card & spritzed with water. I made sure the card was thoroughly dry before applying the dimension paste...........


I stamped the Stampendous Pen Pattern butterfly with Onyx Black Versafine ink & heat embossed with WOW Primary Ebony embossing powder, then I die cut it with the coordinating cutting die from Stampendous. I mixed some Scarlet Brusho with water, painted the tips of the wings & finished the card with the 'Follow Your Art' stamp from Stampendous..............


Brusho Crystal Colours - Starter Pk 2 Pk of 24       Poppies      Dimension Paste - Glossy Black     Tools      FOLLOW ART    
Pen Pattern Butterflies   Stampendous    VersaFine Ink pad - Onyx Black       WH00 Primary Ebony

Thanks for visiting the blog, see you next week. 

Kirsten