Wednesday, 28 October 2015

Cardio Wreath Card.......


Good morning all,

Apologies for the lateness of this post, I have been so busy in my studio lately making samples for my next class, Hobby Art and Imagination Crafts next TV shows and also for the Birmingham NEC show which I will be demonstrating at with Imagination Crafts that I totally forgot about my blog post last night....naughty me, hand slapped and all!!

So here is another sample card made using the wonderful Card-io Stamps, I know I keep saying it but I really have loved playing with these stamps. There are endless possibilities with them and I just love the scale of them......
I wanted to create a scene through a wreath so I chose to use the Card-io Fern Wreath and 


I started by cutting a 6"square piece of super smooth card and stamping the circle of ferns in Mowed Lawn Distress Ink, I repeated again moving the wreath stamp on a little to make the wreath look fuller. I then cut a circle to create an aperture in copy paper using my Spellbinder dies that fitted the size of the inner circle of the wreath and used this as a mask.
I began by stamping the the house first in Black Stazon and then made a mask from Mask-it to cover it. I then added some hills using my mylar hill mask (used in previous posts this month) and Shaded Lilac Distress Ink and also the sky line. Next I added in the fence with the trees and the lastly the deer.
Now at this point I was quite pleased with the scene but it looked a little stark against the green wreath so I decided to add some black stamping to the wreath too, so I added a first generation impression and then moved it on slightly and then did a second generation. This just helped pull the picture all together, you know what it is like sometimes you just don't know until you start playing!!

I wanted to add a sentiment, so I chose the Stampendous Merry Christmas, I love the script of this stamp, it is so flowing.......I stamped it in Black Stazon.

I sat and looked at the image and liked the cleanness of the card but because it was going on a 
white 8" x 8"card I felt it needed something else, so I opted for some snow flakes from the lovely Hobby Art Winter's Snowflakes Stamp Set (another favourite of mine):


So I used the cluster of small snowflakes at the bottom of the stamp set and my Shaded Lilac Distress Ink and stamped some around the edges of the card. I then matted and layered it on to black card and then on my white card......

To finish off I added some bling on to the hills with a Zig 2- Way Glue Pen and some Stampendous Crystal Glitter......


 Well I hope that you have enjoyed the inspiration and remember the blog challenge runs until November 8th. The theme is 'Stamped Christmas Scenes' & you get a second entry if you use Card-io stamps on your project, so why not have a go.....

Until next time......
Big hugs 
Lisa B xxx

Mowed Lawn - Mini   Shaded Lilac - Mini   ZIG 2-way Glue Pen  Crystal Glitter

Merry Christmas Retro Script   Stazon Jet Black  Mask-It

Monday, 26 October 2015

A Trio of Card-io Christmas Cards


Good morning, I hope you all had a great weekend, Kirsten here with more of my Card-io Christmas cards. I used stamps from Christmas Scenery 1, Christmas Scenery 2 &
Woodland Walks.

On this first card I masked off the lower part of a square of white Super Smooth card & crerated the sky with tumbled Glass & Salty Ocean distress ink, then stamped the trees with Versamark ink, covered them with WOW Metallic Silver embossing powder & heat set. The sleigh & reindeer stamp & the rabbits were stamped with Jet Black Stazon ink. I used an embossing tool to add dots of silver Starlights paint....................


I used Versacolor inks on the next two cards, masking off the postbox & the buildings before stamping the trees. I added blue Starlights to this card with a detail stamp from the
 Clematis Elements set by Lisa B for imagination Crafts............


I stamped the images onto a panel of 2 x 6" white card, then cut it into three & finished the card with Icicle Stickles............


I must apologise for the bad photos of a lot of my cards this month, I spent hours wandering around the house & garden, trying to find decent light - and obviously, failing miserably. :(


 Christmas Scenery 1  Christmas Scenery 2   Woodland Walks   Birds Clematis Elements   Versacolor Evergreen  Versacolor Lime   Versacolor Winter Green  Versacolor Lavender   Versacolor Ash Rose  Versacolor Atlantic     Peacock Feathers - Mini  Salty Ocean - Mini   WC05 Metallic Silver  VersaMark Ink Pad  Glitter Glue - Icicle  Stazon Jet Black Super Smooth White    Black Card   Mask-It  


The blog challenge runs until November 8. The theme is 'Stamped Christmas Scenes' & you get a second entry if you use Card-io stamps on your project.

Until next time, happy crafting.

Kirsten

Saturday, 24 October 2015

November Classes - Painting with Starlights


Good morning blog visitors, I hope you've got sunshine where you are, it's a dull & gloomy day here, unfortunately. This is a quick post about the upcoming Maidstone classes in Fant Hall, Barming, ME16 8NN, on November 6.

We're going to be painting with Imagination Crafts' Starlight paints & using stencils, die cuts & embossing folders to make two Christmas cards. 

Below is a snippet of one of the cards................


You won't be restricted to certain colours, all the Starlights will be available for you to use, so you can let your imagination run wild!

As always, we will supply everything, but there are a few things you need to bring you...........

This Imagination Crafts Diamonds stencil, (or similar)............

Diamonds 

You can also bring other Christmas background stencils, such as snowflakes, if you prefer.

You also need to bring the piece of Mylar Lisa gave you at October's Card-io Stamps classes, seen here...........


(There will be one or two of these available, but not enough for everyone, so it is important that you bring yours. New attendees to the class will be given one to keep).

You can bring your own Distress inks, if you choose.

We will have a few embossing machines available, but if you want to bring your own, so that you're not waiting for one to become free, please feel free to do so.

***Please ensure any items you bring are labelled with your name.***

Can I request that, if you know someone attending the class & they don't have access to this blog/Facebook/Twitter, that you forward this information to them?

Thank you.

 There are a few places available in both the afternoon - 2.30-5.30 - and the evening - 6.30-9.30 - classes, so if you would like to attend, please contact us. You can email Lisa; lisabaker1@btinternet.com, or phone her on 01622 675 078, or you can message the 

The cost of the class is £16, with tea/coffee & cake provided.

I also want to remind everyone that, as Lisa will be demoing for Imagination Crafts at the NEC in Birmingham that weekend, I will be teaching the classes - don't be scared, I promise to do my best! - and as a result, I will be bringing a lot less stock for the shop than normal.

If there is anything you want to purchase & want me to bring to the classes for you, you need to order early...........

 From Lisa - no later than Tuesday, November 3, she leaves for Birmingham on Wednesday, Nov 4.

After November 3, contact me, either via the Lisa B Designs Facebook page, or my email; isisimaginings{at}gmail{dot}com, before 8pm on Thursday, November 5. That gives me time to put your order together on Friday morning. 

There is new stock coming in & we will make sure we get it onto the website, so that you can see it in plenty of time.

I will end by reminding you of the current blog challenge, which is 'Stamped Christmas Scenes'. It runs until November 8 & if you use Card-io stamps you get a second entry.

 I'll be back on Monday with another of my Card-io stamps projects. Have a great weekend & if you have any questions about the classes, don't hesitate to contact us.

Have a great weekend.

Kirsten


Friday, 23 October 2015

Jingle Bells

 
Hi there crafters..............Another in the Card-io stamp range for you today.  This one has the layered look about it, with a little bit of bling and some little bells to give it that extra Christmassy feel.


So I started with a 7" x 7" card then cut three smaller pieces of white super smooth card as follows:
5.5" x 5.5"
4.5" x 4.5"
3.5" x 3.5"
Then cut some black card just slightly larger that the white squares.
 
I layered the white squares evenly on top of each other then stuck them in place using some removable tape just on the top, you can just about see the tape in this photo.
 
 
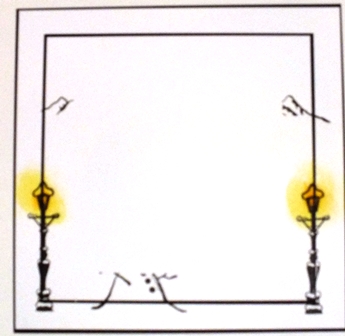
I then took the Card-io Christmas Scenery 1 and stamped the mountain range, twice, using Versafine Black Onyx, which I used throughout by the way.  I decided where the street lamps, from Christmas Scenery 2 where going to go and used a dry wet wipe to apply a small amount of Squeezed Lemonade and Ripe Persimmon where the lamp head was going to be.
 
 
I stamped the lamps and continued with the larger of the two buildings from the Christmas Scenery 2, then the snowman last.  Each time I stamped I ensured they spanned as many layers as possible.
 
I removed the tape from the squares and used an eraser to wipe away any residue tackiness the tape left behind, then mounted each square onto its corresponding black square.  At this point I put the double sided tape on all the layers so once it was decorated I didn't have to worry about it.  I carefully lined up the first square and made sure it all matched before removing all the tape from behind the card, I'm one of these crafters who only removes half the tape from each side and putting the layer into place before removing the remaining tape.
 
So sorry about the quality of this picture I hadn't realised it as was so bad until I uploaded it :o( 

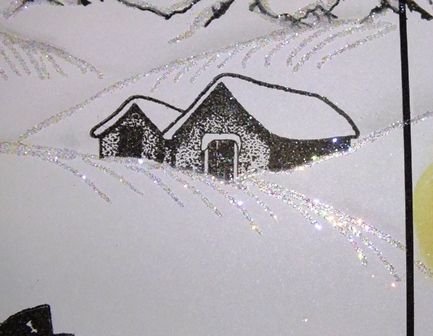
I continued with the next two layers before adding in some little snow dunes by using the handy template and the dry wet wipe and a very small amount of Black Soot Distress Ink to create the mounds.  Then came the fun bit, I drew lines under the ink shadows using a quickie glue pen and then sprinkled Glamour Dust.  I didn't spill any this week :o)
 
I took three little sleigh bell embellishments and tied them to some very thin white satin ribbon then poked a hole in the largest white square in the top right corner, secured it at the back with tape then covered the hole with a sparkly brad.
 
I placed the three layers onto the original card and stamped the word Jingle Bells from the Card-io Christmas Sentiment set on each side of the card then added some squiggly lines and finished with some card candi, however, I would have preferred to add some more bling from the new range on the website but haven't had the chance to get some yet.
 
Here's a close up so you can see the detail of the glittering and the card itself again :o)


 I hope you enjoyed the card, see you again next Friday for a full tutorial.
Love Jan -x-