Friday 30 October 2015

Card-io Tutorial

Hello crafters, This is my first full tutorial for you so I hope you like it.


First I took the inside acetate with the images and cut around each one so I could use them as templates to place and design the card before permanently stamping.


Then I chose a 7" x 7" card and placed the images where I thought they looked best. (I sometimes change my mind and you'll see on the finished card that I moved the rabbit and drew in an additional branch on the tree using a fine line pen)


The next thing was to decide where the skyline was going and went about drawing a wavy line and cut along to create my horizon.


I placed the card on a craft mat with the opening facing me so the card was side on.  Placed a piece of paper under the top of the card and taped it in place, I laid the skyline vertically on the card and taped that using masking tape.


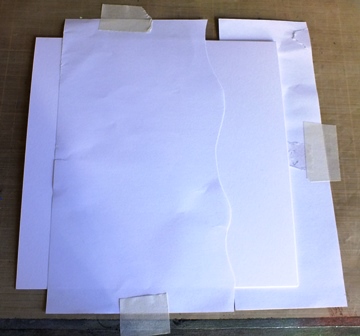
I got all the tools I needed to create my skyline, which consisted of Blending Mat, Speedball Brayer, Salty Ocean and Squeezed Lemonade Distress Inks and Mini Blending Tool.


I wanted to have a little moon, so cut a small circle using my Spellbinders dies and the Mask-it to create my moon.  Placed that in the position then using the brayer and Salty Ocean I blended it on my craft mat to the desired colour and transferred the colour to the card until I reached a nice shade of darkish blue.  (Sorry forgot to take a picture at this point, but you will get my drift later)

I removed the mask and the tape to reveal the skyline, then cut the moon again using copy paper and used the cut out section as a mask to create the yellow moon using the Squeezed Lemonade and a blending tool.


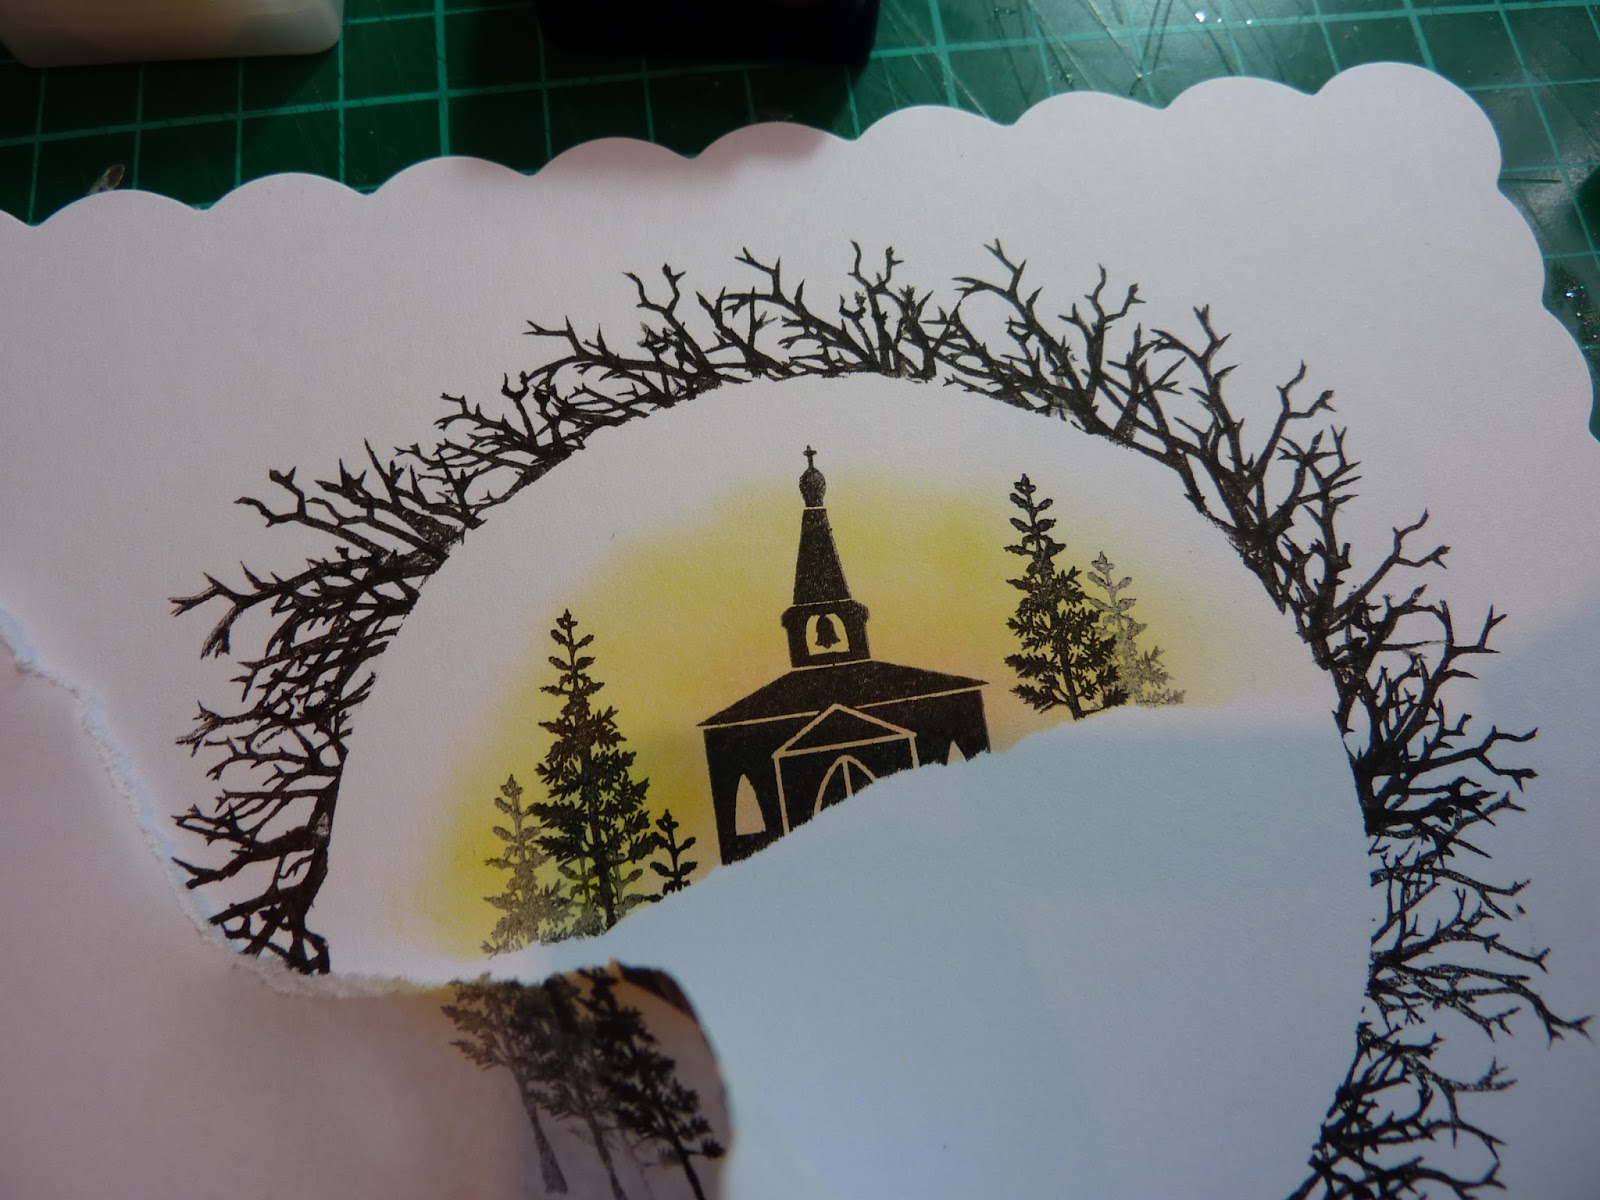
Next came the stamping, using the Card-io Combinations Christmas Scenery 2, Stampeaze and Versafine Black Onyx, stamped the Santa and Sleigh across the moon.


Then stamped the remaining images where I previously decided.


So to give the card some perspective, I used Cosmic Shimmer Glue along the skyline, under the houses and on the roofs, tree, rabbits and snowman, then covered the whole lot with Glamour Dust.


I left the glue to dry for a while before tapping off the excess, and brushing off where the glitter had stuck to the black images.

I finished off with a little Card-io Christmas Sentiment here's a close up and the finished card again.


Very simple little card but I hope you've enjoyed it and see you again next Friday.
Love Jan -x-


Thursday 29 October 2015

Creating a Card-io Christmas Wreath


Hello crafty peeps! My last post for this month using some of the fab Card-io Combinations stamps. I have found the more I play, the more of the other sets I have purchased, so that I can vary my cards and create different little scenes all the time! (fatal for the bank balance, but then at least these images allow you to create endless amounts of different card combinations!)

For this week's card and samples, I have chosen to make a frame using two of  the stamps within the Card-io Winter Walks set. The full stamps are actually the small and large bare trees, but I have used only the branch sections.

To begin with, I have used a plain circle die and used this to cut out some copy paper. This created a  'mask' for me to use when stamping. I placed my copy-paper circle in the middle of a 6x6 card blank and mounted the large tree to a clear block. Using Black Onyx Versafine Ink, I have stamped the tree all around the circle, rotating my stamp to create a continuous 'wreath' style pattern.


Once I had gone all around the circle, I then went back over any patchy areas with the smaller tree; I did not want a uniform look (just as well really!). 


Once you have removed your circle, you have created a perfect frame to stamp inside and create any picture of your choice! Tip: before you throw your circle away, turn it around and practise stamping your scene. This way you can check the arrangement of your stamps and have a 'master' to work from!
My next stage was to use some torn copy paper to make a hill 'mask' and create a sunset sky effect (for a more detailed explanation see my post 15/10/15).


Back to the Card-io Winter Walks set and using the fir trees and the church this time...


To complete the scene I have used the smaller set of people from the same set, the fir trees on their sides to make some bushes and the large bird sitting proudly at the front of the wreath. A little Crystal Glitter to add some sparkle and a sentiment from the Card-io Christmas Sentiments Set completes my card.


To completely change the effect, I also tried using the same idea, but this time on black card... 


 I stamped the trees using Versamark in the same way as before, but this time used Wow Bright White Powder and heat embossed.
I have used  a sentiment from the Card-io Christmas Sentiments Set for the main feature instead of a scene (stamping and embossing again) and backed the main panel with red card. The red ribbon and some red gems tie the colour in.


You can also use the stamps on altered art...


This is an MDF bauble that I showed during my post on the 15th October. On the front I used images from the Card-io 'Winter Walks' set, and on the reverse pictured above, I have used a sentiment from the Card-io Christmas Sentiments Set.  Around the edges I have used the same tree stamps as above, stamping in Versamark and embossing with Wow Metallic Silver Powder. To bring the edges in I have rubbed a little Inka Gold Silver.

A couple of variations for you; have a try and see what you come up with! Make sure you enter our blog challenge and you could win £20 towards your crafty spend! See Kirsten's page for more details and enter before midnight on the 8th November!

Thank you for your company,
Lots of love,
Martina
xx


Christmas Scenery 1    Christmas Sentiments      Squeezed Lemonade - Mini Stazon Jet Black         Mini Blending ToolsVersaFine Ink pad - Onyx Black Cosmic Shimmer Dries Clear Acrylic Glue - 30mlCrystal GlitterRipe Persimmon - MiniWhite LinenWC05 Metallic SilverInka Gold - SilverWL01 Bright White 160ml