Showing posts with label Tim Holtz. Show all posts

Friday, 23 June 2017

Indigo Blu & Imagination Crafts

Hi all you crafter out there, how have you been coping in this hot weather?  It's nice to relax in but not work, at least it's a bit cooler now.
 
Today's card is using the Indigo Blu Ella Bella stamp again, (this is on sale on the website at the moment), but this time jazzed it up with some Distress Inks and Imagination Crafts New Art Stamps designed by Lisa herself.


I started with a 7" x 7" white card and matted it with a piece of black then white card.  The white card was used to create the image.
 
 
I wanted to use a few of the distress inks so used the following:
 
 
Using smoothies I covered the white card randomly with the distress inks, blending as I went.


Next was to stamp the Ella Bella image onto the side of the card using Versafine and Wow clear Embossing powder. 
 
 
I wanted to add some background stamps so chose Imagination Crafts Art Stamps Distress Textures 1.   I randomly stamped a few of the images over the card until I was happy with the result.


I then stamped a few butterflied from the Imaginations Crafts Art Stamps Time to Celebrate set to cut out and 3D onto the butterflies. 
 
 
I just cut out the wings not the bodies, which was nice and easy.  I love using these little butterflies at the moment, they are a great embellishment when they are 3D.

 
I then thought the whole thing needed a little sparkle, so used a glue pen on some of the background images and dipped in some glitter.  I also drew in some glue into Ella Bella's hair and glittered that too.
 
 
Next was to stamp a little sentiment also from the Time to Celebrate set and cut into shapes then backed them with black card, Lisa and the team are doing this on their cards at the moment and I think it's a lovely effect.
 
Next was to mount the card together and place the butterfly wings on using cosmic shimmer dries clear glue and the card was finished.


I hope you enjoyed this little card today and thank you once again for dropping by.
Love Jan -x-


Thursday, 10 September 2015

Using Dylusions Paints as Accents


Good morning crafters! So here goes my first DT post for Lisa B. Designs...am I nervous? YEP! I am often told that I prattle on, (what can I say, I get excited!) so please have a read and let me know if you would like more or less of anything!

Lisa's first challenge for me was to play with some Dylusions Paints. Never having really seen them before I was intrigued, but skeptical at first, as to be honest I do already have a lot of paints in my stash! Now, I have to say I am impressed; I have discovered lots you can do with them and we shall be looking at this over the coming month together.

The first thing I did was to pick 3 colours. In an attempt to shy away from my usual comfort zone of pink/purple/turquoise I decided to go for blue/yellow/green. First issue encountered folks: what does blue and yellow make when mixed...?!! Still, I had to chuckle and my realisation sent me exploring how to use the paints in different ways again! I had no idea that depending on your method of application you really could get very different results. Lisa explained this in her September class as well, which is another great reason to pop along, as you can play and experiment with loads of methods and products before deciding to buy the bits you really like. 

So, onto the card made...
The first step was to make a 'masterboard'. This is basically a totally free-form large 'board' that you make your own by using whatever you like! Grab all your stamps and stencils and get experimenting - you can't go wrong! You apply layers of paint to create interesting backgrounds, adding detail and interest as you like! For my first one I used some of my old-faithfuls including my Speedball Brayer. I later came to realise that this gives a very different effect to the harder Woodware Mini Brayer. Both are fab, but the Speedball gives a denser effect, taking in a lot more paint. Both are good for different effects! Remember there is no 'wrong way' to make a masterboard. 


For the first layers I have applied Lemon Zest Dylusions Paint with the brayer randomly over the whole page. On top of this I have then used Fresh Lime Dylusions Paint and finally, the same again in London Blue. Yes, it looks patchy and streaky, but bear with! As I knew I wanted to have a prominent stamp on my work, I wanted to take some of the colour intensity down a shade. To do this have brayered White Linen Dylusions Paint over the top, giving depth to the piece and allowing me to add some more layers.


Now in come the stencils and stamps for a play... I started with the Imagination Diamonds Background Stencil and used the Lemon Zest paint again to pounce the paint through with a Tim Holtz Blending Tool. I applied the paint all over the board in this way. On top of that I have used the Fresh Lime and London Blue paint to stamp one of the IndigoBlu Itsy Bitsy Backgrounds. The final layer was more of the same two colours applied again, this time using IndigoBlu's Vintage Flourish stamp...phew!


Once the masterboard was dry, I used Indigoblu's Elizabeth Bennet to stamp onto it a couple of times with Black OnyxVersafine Ink, embossing with  clear detail powder. Yes, again it looks very dodgy at the mo, but I only want to take accents from the stamp! From the images stamped I cut the flowers out, along with some of the butterflies which are hidden in the background. On a a new sheet of card, I stamped and embossed Elizabeth again and cut out using a die. On top of this image I have decoupaged my masterboard flowers and matted the whole image onto black card, all using Cosmic Shimmer Dries Clear Glue.


To finish the card I have returned back to my masterboard and chosen a vertical slice that I liked, cutting and mounting this onto black card across a card blank. Now the two main sections of the card tie-in. To finish, I have used the butterflies cut earlier and added them to the top section of the card with some pearl detail, along with a sentiment from a Hobby Art collection I am fond of.


Thank you for reading though my post, I hope you enjoyed it and I will be back next week with another card to show you!

Have a great week; the weatherman has forecast a wet weekend, so a perfect time for some crafty time!

Love

Martina
xx

 Fresh LimeWhite Linen Cosmic Shimmer Dries Clear Glue 125mlLondon Blue Mini Blending ToolsMini Blending Foams Itsy Bitsy BackgroundsLemon Zest Diamonds Elizabeth BennetVersaFine Ink pad - Onyx Black  Vintage Flourish Dinkie 

Monday, 16 February 2015

Flutter By

 
Hello all, first of all I need to apologies for the brief post today, unfortunately we've been very poorly in our house hold this week and it's knocked me for six.
 
 
*This post is part of the February promotion fortnight. Remember to leave a comment to be entered in the giveaway.*
 
 
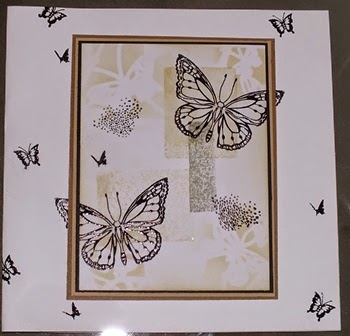
First of all I used the Butterfly Delight Stencil from Imagination Craft, and stencilled it with Antique Linen Distress Ink.  Then used an acrylic block to create some inky shapes again using Antique Linen and Pumice Stone
 
I took some coordination card stock in two tones of brown and matted them behind inked card which was matted onto black card.  I stamped the Hobby Art Butterflies using Versamark and Wow black embossing powder onto the background pattern before matting them all onto a 7 x7 card.  Again using some butterflies from the Hobby Art butterflies stamp set, I finished off the card with a few random butterflies and also stamped a couple of images from the Hobby Art decorative background set.
 
Once again I've very sorry this is short and sweet, see you again in March. 
 
Thanks for dropping by
Love Jan xx


Monday, 26 January 2015

Your Birthday's Humming!!


Good morning all, hope you're all well and had a good weekend.  Mine was taken up with crafting and I was in my element :o)
 
Today's card is made using some Hobby Art stamps that are still on special offer.
 
 
First of all I chose a 6 x 6 card and stamped around the edge using the Hobby Art Birthday Vase Set
you have a choice of words and rearrange them how you like, then just added a little squiggle around the edge too :o)
 
 I then took a flower and humming bird stamps and arranged them on a piece of 4 x 4 white card as below:
 
 
I took a pencil and marked under the stamp where I wanted the humming bird to go:
 
 
I moved the stamps out the way and went ahead and stamped the humming bird with the tip of his beak on the pencil mark.  I created a mask of the humming bird using the Woodware Mask-It then stamped the flower image over the top:
 
 
Once I removed the mask I decided to do a little paper piercing by stamping the flower image onto a piece of Anna Marie Dotty Pink Card and cut around the frame.
 
 
I used a combination of Imagination Craft Silkies and Water Colour Pencils to colour in the images, then finished off the Humming bird with a little clear Wink of Stella, unfortunately it didn't photograph very well, but hopefully if you're at the next workshop you'll see the finished card there :o)  I used a little of the Tim Holtz Spun Sugar Distress Ink around the edge of the images to take off the stark whiteness.  I then mounted it on to black card and more dotty card, and using foam pads mounted the images onto the card, here it is again.
 
 
Thanks for dropping by, I hope you enjoyed today's blog, and look forward to see you all here again on 6th Feb.