Showing posts with label Inka Gold. Show all posts

Monday, 20 March 2017

Hobby Art's Nature Reserve


Good morning, Kirsten here with another of my Hobby Art projects, I hope you had a nice weekend.

Today's project is a card & I used Hobby Art's Nature Reserve stamp set............


I began by applying Imagination Crafts' new Structure Paste (have I said how much I love this texture paste???) through the Craft Emotions Poppy Fields stencil on to a square of white card & set it aside to dry for about 15 minutes - 15 minutes!!! ðŸ˜®

Look how perfect the impression is............


I used a stencil brush to randomly apply Deco Arts' Chalky Finish paints - Smitten & Innocence............


When the paint was dry I sanded the paint to reveal the white paste underneath............


Then I lightly applied Champagne Inka Gold metallic paint.....................


While other projects were drying I had stamped the bird & flowers from the Nature Reserve
Oliver the Owl sets onto white card with Onyx Black Versafine ink, heat set with WOW!'s Clear Gloss embossing gloss. I used Distress inks with water & a paintbrush to colour everything, then cut out all the pieces..............
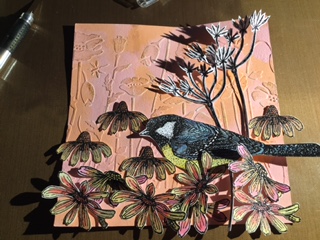


I stamped the Stampendous Celebrate Birthday stamp onto a die cut piece of black card with clear embossing ink & heat set with WOW!'s Opaque Bright White embossing powder & the card was ready to put together...............


Janie's Collection - Nature Reserve - NEW!!   Janie's Collection - Oliver Owl - NEW!!    Poppy Fields CEST A5       Inka Gold - Champagne    Structure Paste IC   

SM Spatula JT3    Americana Chalky Finish Paint - Innocence   Americana Chalky Finish Paint - Smitten    Emboss Ink Pads     

VersaFine Ink pad - Onyx Black      Bright White Regular WEP     Clear Gloss Regular WEP     Celebrate Birthday


Thank you for looking, see you next time.

***On the website, some Hobby Art stamp sets have been reduced in price by 25% - 40%.***

Kirsten


Thursday, 8 December 2016

MDF Christmas Word Art with lots of Sparkle!


Hello crafty friends!
How are you all? I love that crafting is such a friendly hobby, it's so lovely to speak to lots of people and share hints and tips! I love it when I meet someone as keen as me about crafty things, I feel reassured that I am not the only paper-sniffing, stamp collecting, Pinterest mad, ink covered, paper hoarding person out there...

Time for playing with some Christmas MDF this month - something I love!

I started with a blank, un-primed MDF word from Imagination Crafts...


and painted front and back with one of my favourite Starlight Paints: Menthol.


Once dry, I added some Starlights White Gold using a natural piece of sponge, as I wanted to try and get a textured look.

Once this was dry, I used a star stencil from my stash with some Welsh Gold Sparkle Medium to highlight the centre letter with some detail. I love this colour of Sparkle Medium, it goes with so much: vintage, Christmas, male cards, you name it!


Putting the word aside to dry, I set to work on the embellishments. I wanted to add some poinsettias with a difference, so I die cut them in several sizes using some of the gorgeous Woodware Vellum. This vellum is nice and thick and gives a lovely effect when cut and embossed (which I will show you later!) You will notice that I was a little hasty taking some out of my dies and de-leafed a couple, but it didn't matter, as those bits will be hidden in the layers!

Before embossing any of the petals, I used some Spectrum Noir Pencils to colour them. I chose to make the greens/white style of Poinsettia, as this would tone in with my MDF base:


There was no need to be precise with the colouring, it was done mainly to give some tone and difference so that the flowers didn't look 'too perfect'.


Once coloured, I put the petals back into the dies and embossed. A tip here: either emboss in the middle of your machine if you have a large platform one, loosen the pressure if you can, remove a plate or place the vellum in some paper before embossing, so that you protect it and prevent it from cracking.


My next step was to enhance the colour and for this I used Champagne Inka Gold on the edges of the petals. I used my finger to lightly apply the medium, creating a shiny effect.


Once this was dry, I used my finger again, this time applying Imagination Craft's Inca Gold Alchemy Wax all over the embossed areas really making them pop.

To finally assemble my flowers I off-set several layers and glued together. I then used some glue gel to make a centre dome and added some white and yellow seed beads along with some brown glitter. Odd combo I grant you, but I like it!


Wanting to add yet more embellishments to my finished piece, I raided my beading and jewellery stash and used some wire to make some 'hangy bits' (I am sure there is a professional word, answers on a postcard please!)


All bits complete, some ribbon, fiddling with the layout and I was done!


I hope you like it, I had fun with it and loved using lots of different things from my stash to make it.

Love
Martina
xxx

Menthol SLWhite Gold SLMDF Words - JOY Welsh Gold SM Pure White VellumInka Gold - Champagne Inca Gold AWX


Friday, 5 February 2016

Birthday with Inka Gold


Hello crafters, well it's my last blog for the look back at 2015 and I've chosen one of my favourites.  This is were we had fun with lots of texture using Gesso and Inka Gold  Gilding Waxes.

 
So I started with my usual 7" x 7" white card and matted it with black, then cut a piece of scrap white card slightly smaller and set aside.  I then chose a few embossing folders from my stash, there's lots to chose from on the web, and embossed some Super Smooth card and cut them all down in different sizes so that it covered the backing card.


Stuck them into place:


Ignore the colour card, that was an experiment that went wrong but didn't want to waste the card.

I then chose the embellishments I wanted to use, again lots on the web, I also used a couple of dies, from my stash, that I cut out three times each, glued them together to create the dimension.


Then positioned them on the card before decided where they should be stuck.  The die frame was stuck down and painted inside before sticking the guitar down to ensure I got a good coverage of the Black Gesso.  

Set that to one side to dry for a while, this doesn't take very long at all, it can be speeded along with a heat gun.

 
Then it was a case of choosing the waxes I wanted to bring out the patterns, so I chose the following colours:

Cobalt Blue
Champagne
Magenta
Silver

Here's the card again


Thanks for dropping by, hope to see some of you later today
Love Jan -x-