Friday, 10 November 2017

Woodware Snowman

Hi there crafters, sorry it's been such a long time since I last blogged.
Today's little card is a quick and easy one which I used the Woodware Mr Frosty stamp and the Hobby Art Snowflakes stamps, I thought they complimented each other

I started with a 7" x 7" white card blank and cut three pieces of silver mirri and three pieces of white card as follows:
Mirri = 6" x 6"
5.1/4" x 5.1/4"
3.3/4" x 3.3/4"

White Card = 5.3/4" x 5 3/4"
5" x 5"
3.1/2" x 3.1/2"


On the largest piece of white card I used the Hobby Art Snowflakes and randomly stamped the largest of the snowflakes all over the card using the Press to Impress Stamping Tool and Versa Colour Baby Blue


I carried on the same way with the second largest piece of card until I was happy they had enough snowflakes


On the smallest piece of white card I stamped the Woodware Mr Frosty Image using Versamark and Wow Bright White Embossing Powder, I know it looks a bit pale but the card does look good in the flesh :o)


The next thing was to stamp the same image on some Woodware Mask-it to create a mask for me to continue with the snowflake stamping without going over the snowman.


Once I removed the mask I wanted to give the snowman a little colour, so using my water colour pens I coloured in his hat, scarf and nose, then used a silver Gel pen to colour in the Stars.


Then all that had to be done was assemble all the elements together by simply matting all the layers together.  I flat matted the first two layers then 3D the snowman image for dimension.  I stamped one of the little sentiments on top of the card and then added a few die cut snowflakes I already had in my stash.  Because I had used 3D foam on the snowflakes and they were and open pattern you could see the pad behind the snowflake so just put a little glitter in the centre of each snowflake to hide the pad.

Here's the card again.


Thanks for dropping by the blog today, and hope you enjoyed it, maybe try using black Versafine for the snowman I'm sure he will look just as jolly :o)

Love Jan -x-


Gift Vouchers Available 
                                            lisabdesigns@btinternet.com/01622675078

Wednesday, 8 November 2017

Jofy Christmas Card.........

Good afternoon all,

This post is a bit later than planned but you know me!!!!

Well I haven't been that great this past week as I came down with a cold that seems to be going around and the virus has really affected my fibro and it has been so painful but hopefully I will kick the cold soon and feel a little better. There are a lot worse off people in this world, that's what I keep telling myself!

Anyway enough of my babble.........and onto the crafting...... 

I thought that I would show you today a card that I made using one of the fabulous new stamps from Jo Firth Young. I just love Jo's designs, they are right up my street and I love the contemporary look of them.

The stamp set that I used was JOFY 56, I also added another stamp on the corners of the card from JOFY 55. I find these two stamps sets really work together but then I often find that with Jo's designs.


Image result for JOFY56Image result for jofy 55  


So this was quite a quick and simple make.......
On a 5.5" square of watercolour card I stamped the main image of the baubles from set JOFY 56 to the left hand top side of the card with Versamark Black Onyx. 
I then stamped the message from the same set on to the bottom right of the card. At this point I felt it needed some corner pieces, so I took the sort of shooting star stamp from set JOFY 55 and stamped it twice on each corner as shown going in opposite directions. 
I wanted to 3d some of the main bauble image so I stamped it again on a piece of spare watercolour card.

Then it was time to set about colouring.......

I used watercolour pens to colour in the images.
Once all the images were coloured I cut out a star and a noel tag from the spare piece that I stamped and added some 3d foam to the back of them and attached them to the card.

I wanted to add in some background but still keep the cleanness of it so decided to add some watercolour splatters with my paint brush and Distress Oxides.

Then to add some detail I used a gold marker pen to add in detail to the bauble top and the twine as you can see below. I also edged the outer of the square with a gold pen and then matted it on to yellow and then black card before attaching it to my card front.


 The last detail that I wanted to add to the card was some shine and glitter, so I used Glossy Accents on the bauble and all other areas that I had coloured red. I decided to add a touch of gold Glamour Dust glitter just to the left hand side off the bauble to add an extra glow to it and voila, I was done.


Well that is all from me for now, I will be back with you next week. 

Not long now before the Christmas Workshop in Grove Green and we're down to the last couple of places. Click for details and booking information

Have a great week
Hugs, Lisa B xx


Gift Vouchers Available 
lisabdesigns@btinternet.com/01622675078

VersaFine Onyx Black     Fossilized Amber Distress Oxide   Fired Brick Distress Oxide   


Mini Glossy Accents

Monday, 6 November 2017

Christmas in the Country

Good morning, Kirsten here, I hope you had a great weekend. I have another card from last week's Maidstone classes to show you today. I wanted to make a different type of winter scene to the class projects, so I used the Woodware Clear Magic Snowman Family stamp with Hobby Art's Nature Trail set...........


First of all, a very easy background created with Distress Inks; Picked Raspberry, Spiced Marmalade and Squeezed Lemonade on a square of white card............


I stamped all my elements with Onyx Black Versafine and heat set with WOW! Clear Gloss embossing powder and coloured the snow people with Distress inks before cutting everything out. I also cut two pieces of white card to make hills. I blended Tumbled Glass Distress ink on both, stamped a sentiment from the Woodware Clear Magic Christmas Cheer set on what would be the lowest hills, then covered both pieces with double sided adhesive before applying 
Diamond Frost Frosty Dawn loose glitter on top...............


I spent a bit of time arranging the placement of the elements and deciding which of the snow people I was going to use.............


...........Before settling on the finished layout...............


I used a Micron black pen to ground the rabbit, deer and snow people, it worked very well over the glitter.

I am rather pleased with how this card turned out, I hope you like it too. 


Snowman Family - NEW!!!    Christmas Cheer - NEW!!!   Nature Trail HADiamond Frost Frosty DawnDouble Sided Adhesive Sheets A4    Micron Fineliners Pk of 3    

VersaFine Onyx Black    Clear Gloss Regular WEP    

We're days away from the Christmas Workshop in Grove Green and we're down to the last couple of places. Click for details and booking information

Until next time, have a great week.

Kirsten

Wednesday, 1 November 2017

November Snowmen Class Cards.....

Good evening all......

Apologies for the lateness of this post but you know what they say......better late than never!

I have had a rather exciting week so far, a little different from the one planned but never the less all good. I got called in to help out at my sister's yesterday as my beautiful niece Heidi had her second child yesterday and we welcomed in to the world a gorgeous baby boy to our family weighing in at a hefty 9lb 3oz, no wonder she was exhausted by the end of the pregnancy. He is so lovely and I can't wait for another cuddle! So hence no blog post was wrote up and scheduled last night ( see I did have a good excuse! )

Anyway, enough of my news and back to the crafting........

These are the two variations of cards that I made for last Fridays Craft Class at Fant Hall. Now apologies again as I didn't realise that this would be such a popular subject and although I bought a lot of stock in, we sold out of nearly all of it at the classes and as I only have the Christmas Party Classes left I won't be restocking these but at least you get to see the ideas here on the blog.

So........I don't know about you but I love snowmen, I always have even from a small child and these gorgeous Woodware Stamps were right up my street and inspired me so much. I really love the different characters of them all. I also used a lovely Snowflakes stamp set from Hobby Art.


Here are the stamp sets that I used pictured below........


Image result for woodware snowman family

Image result for Hobby Art Snowflakes

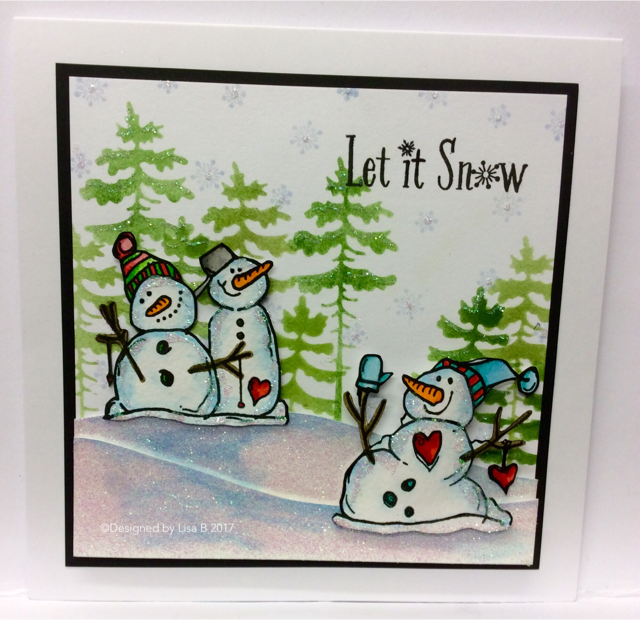
The trees in the background were done by inking through the waste from Joy Crafts Happy Holidays Pine Trees dies. I used Distress inks in two different greens to add a contrast to them. I stamped some tiny snowflakes with Versacolor Baby Blue on to the background too.

The foreground was made by cutting two pieces of watercolour card into opposite mound shapes and then adding some colour with a blue watercolour pen. I then adhered some double sided sticky film to the coloured side of the mounds, trimmed off the excess and then pulled off the other side to reveal the sticky side and added loose fine glitter to the mounds. Little tip: If you burnish them ( rub them hard )  with your finger it will show the colour through more.

I then stamped my snowmen on to watercolour card with Black Onyx Versafine ink  and the coloured in the snowmen with watercolour pens and cut them out. I attached the mounds and the snowmen to the background, matted it with black card and attached it to my card and then finished odd with a little more glue pen and glitter.

The great things is with these snowmen that you can chose how many you want to use and make different scenes with them as you can see below......


The second card that I designed was made in a similar war but I used a Stampendous Snow globe stamp as the O in the word snow.

Related image

The circle of the globe was coloured in the same way as the first card and again covered with double sided sticky film and then glittered in the same way, The background was made using the Snowflake stamp set and Distress Inks and Versacolors. I used a set of alphabet dies from my stash to cut the letters out.


You can change the look of the card by choosing different colours......


Well that is all from me for today, I am going to put my feet up and have a cuppa.
Have a great week and I will be back soon with some more makes....

Big hugs
 Lisa B xxx
  
Double Sided Adhesive Sheets A4Diamond Frost Aurora SparkleVersaFine Onyx Black

Mowed Lawn - Mini   Bundled Sage - Mini  Versacolor Baby Blue