Tuesday, 12 June 2012

Mirror Magic


Good morning, blog visitors.  The rain is pouring down & it's cold, are we sure it's June??

I want to show you the third of Lisa's sample mirrors from her June 1st class.  This one was made by Suzanne, a friend of Lisa's.  Those of you who attend the classes will know her.  Apologies, but I can't remember exactly which inks she used, I'm fairly sure she mentioned Oregano & Lettuce Adirondacks.


To highlight the poppies, Suzanne used Spectrum Noirs over the black Versafine ink & added some glitter.


Gold Stickles give great texture to the web & you can see how the various colours of the leaves give extra dimension to the tree.


I'm keeping it short & sweet this morning.  Hope you're all well, thanks for looking.  See you soon.


Keep crafting!


Kirsten

Monday, 4 June 2012

Mirror, Mirror On The Wall

Hello blog visitors, thanks for stopping by.  It's a bank holiday here in the UK & true to form, the weather is terrible.  The rain & wind woke me before 4a.m & I've been up since 5.  I do feel very sorry for all those attending Jubilee events, after last week's glorious sunshine, this weather is a real letdown.  If you are feeling a bit miserable, perhaps this post will make you smile.

Today's photos are from Lisa's class last Friday, June 1, which was a continuation of May's brayer techniques class.  This time we had a mirror to decorate - gulp!  There was a high level of trepidation amongst the attendees & an even higher level of concentration once we got started.  But by the end of both classes everyone seemed delighted with their mirrors & happy that they had pushed themselves a little further past their boundaries.


Lisa took us through the various steps, one by one & it was a very interesting process.  We used Distress inks & Adirondack dye inks & it turns out that it's much easier to use a brayer on wood, than on paper.  (Lisa had prepared the mirrors with matte emulsion paint beforehand)  No matter how we used the brayer, we didn't get any streaks, or lines & the painted wood absorbed a lot of the ink, so we were able to put  lots of layers of colour on.


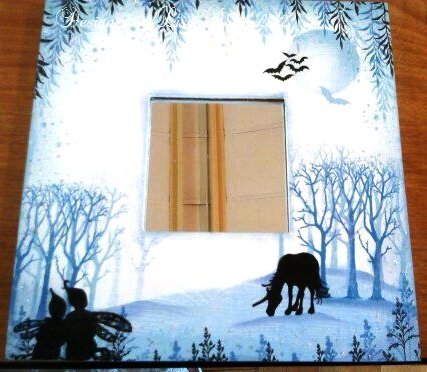
The mirrors in this post are two of Lisa's samples, using pink & blue shades, with black Archival ink for the over-stamping & stamps from Lavinia Stamps.


She made a mirror in each of the two classes & I definitely want you to see them, especially the one from the evening class.  For that Lisa used Antique Linen, Walnut Stain & Tea Dye distress inks & it is GORGEOUS.  Keep an eye out for it in a future post.


I struggled with my background, first because I couldn't decide on the colours I wanted & then, once I got started, everything was very symmetrical & balanced, which, no matter how hard I try, I can't seem to avoid.  Lisa came to the rescue & I watched in awe as she created mountains & shadows where I had just blocks of colour.  I hope to finish my mirror in the next day or two, I'll let you know when it's on my blog, in case you'd like to see it.


 I think n the above picture you can really see the different levels of stamping, as well as the grain in the wood, which gives the images great texture.  Watching a picture being created using just stamps & inks is something I never get tired of.

That's it for now, I have to go see a man about a dog - I'm dogsitting for friends at the end of the week.  I hope to be back tomorrow with another mirror from Friday.  In the meantime, thanks for visiting, enjoy the rest of the holiday weekend and

Keep Crafting!

Kirsten


Wednesday, 30 May 2012

My New DT for Hobby Art

Hi Peeps,

Sorry it has been a while since I have last posted, I have been so busy since I came back from holiday catching up on everything!!

I have some news!
As a lot of you know I love Hobby Art Stamps and think that Jenny Mayes is a lovely lady and Jenny has asked me to be a part of her design team so I am really pleased that she loves what I do with her stamps.
I have posted a little inspiration for you to look at.........

This first card is one of Jenny's new stamps called 'Bird House' and is available on my website here. I have used some elements from 'Woodland Scene' set which is one of my ultimate favourite sets of Jenny's as you can mix and match this set with loads of other stamps. I have coloured with 'Spectrum Noirs' and added a little glamour dust.
'
For this next card I used another new stamp called 'Floral Bird House' and again I have used elements from 'Woodland Scene' set and also 'Poppies Scene- it' set. Again I coloured it with 'Spectrum Noirs' and paper pieced the roof and then added a little glossy accents. The message is from my favourite Hobby Art wording set which is 'Sentiments'.
This next one is from my favourite set which is 'Woodland Scene' although this is a cute set if you take away the mice it is a brilliant set of lots of additions which can be used with many other stamps. I coloured this one with 'Spectrum Noirs' and paper piced his red jacket with red core'dination cardstock and then added a little gloss on the mushroom.
Here's a little closer look at that lovely little mouse and mushroom!

The last one that I am going to post today is also from the 'Woodland Scene-it' set. I have again coloured with 'Spectrum Noirs' and de-coupaged the little mouse and added a little gloss, here and there.
Another closer look at the little mouse on this one!

Just to remind you that Jenny Mayes is coming along to demonstrate at my 'Paper Craft Event' on
28th August , Fant Hall, Barming, ME16 8NN along with Helen Meighan from Helidot and I will also be demonstrating on the day too along with Kirsten.
It will be a great day out full of inspiration and great bargains and offers and some great refreshments and cakes mmnnn!!
 Well that's all for now, take care and keep crafting!
Big Hugs
Lisa.B.x


Tuesday, 22 May 2012

Happy Birthday Lisa!!

Hello blog visitors, thanks for stopping by.  It's been a beautiful day here in Kent, we've had high temperatures & lots of gorgeous sunshine.


Today is indeed Lisa's birthday & I hope she is having a lovely day.  Unfortunately, she is not feeling very well.  Those of you who attended her class at the beginning of the month will remember she had a virus & was losing her voice rapidly.  She is still under the weather, so I am sure you will join me in sending her get well soon wishes.   Despite being unwell, she has been adding new items to the website & working on a newsletter, so keep an eye on your inboxes. 


Among the new items are sets of six SPECTRUM NOIR pens.  These are acid-free, alcohol ink pens.  They are double-ended & come in an assortment of colours & shades. Each pen in a set of six coordinates perfectly with each other & there is also a set of neutrals, perfect for skintones.  If you like to colour with pens, but don't like the lines & streaks you get with 'ordinary' markers, then try Spectrum Noirs.  They blend extremely well & at only £6.99 a pack, they're a very affordable way of taking your colouring skills to the next level.

If you are a complete beginner to using SNs, then Lisa also has Leann Chivers DVD tutorial.  It's packed full of hints & tips, step by step colouring projects, in fact EVERYTHING you need to achieve perfect colouring.


The images on the cards I'm showcasing today are Imaginations Decoupage Stamp Sets & Lisa has used various techniques, including colouring with Spectrum Noirs & paper piecing.


Before I go, I'm happy to say that the winner of the blog candy, has received her goodies & hopefully, she is having fun playing with them.  Brenda, if you would like to show us what you created, email me some pics & I will post them here.

Lisa's next classes will be June 1st in Maidstone, which will be a nice start to the Jubilee weekend.  I shall find out if there are any spaces available & let you know.

I hope to be back soon, so until then,

Happy Crafting!

Kirsten

Saturday, 12 May 2012

Calling Brenda

I'm still waiting to hear from Brenda so that I can send her goodies...........

Kirsten

Tuesday, 8 May 2012

Monochromatic Magic & A New Blog Candy Winner


Greetings blog visitors, Kirsten here again with more samples to show you from Lisa's most recent class.  Before that however, something VERY important............


I woke at about 4a.m this morning with the sudden realisation that I completely forgot about the blog candy!  Sadly, I never heard from the first winner, so I have drawn again & this time Mr Random.org gave me number 6, which coincides with

BRENDA

who said:

WOW!!! What a great site..Lots of inspiration... Fab colors for the candy..be great to win some..Good luck Lisa you have worked so hard and you deserve to be sucessfull in your new venture xxx Luv Bren x

Congratulations Brenda, please contact me with your details at isishestia@yahoo.com as soon as possible & I will mail out your prize.


So, on to today's cards.  You may remember yesterday's post was about the brayering segment of last Friday's class.  To ease us in gently :) Lisa started us off with monochromatic stamping on the beautiful scenescapes, also from Lavinia Stamps.  These are pre-printed designs on slightly glossy paper - basically, the background has been created for you & all you need to do is add the main images.


We began by stamping in corresponding colours of Distress inks, ie, Stormy Sky on a blue scene, Dusty Concord on a purple scene, as on the two cards above.  I was slightly worried initially as the DI was very wet on the glossy paper & looked very dark, but as it dried - there was no need for a heat tool btw -  there was quite a transformation; the images became faded & merged into the scene.


We then stamped the same images with black Archival in places before stamping the focal image.  The result is an excellent background effect, where your stamping blends beautifully with the printed scenescape.


Lisa has added Distress Stickles & Glossy Accents to highlight certain areas & really, that's all you need to create a very effective card.  On the card below, she has made a beautiful reflection of the unicorn & the castle.   I love the leaf fronds in the 'water'.


The scenescapes come in assorted sizes & designs & I know Lisa is working very hard, trying to get them onto the website as soon as possible, but if you can't wait, email her via the Contact Us page.


If you are going to the ICHF show in Brighton later this week, Lisa will be demonstrating on the J and C Creations stand, so stop by & say hello.

Thank you again for visiting & for taking the time to comment, we are grateful.  I'll be back in the next few days with more cards to show you.  If I get any news from Lisa regarding new stock on the website, I shall post both here & on FaceBook immediately, so if you are on FaceBook & you haven't 'liked' Lisa B Designs, you know what to do!!

Until next time, keep crafting!

Kirsten


Monday, 7 May 2012

Brayering for Beginners

 Hello blog visitors, Kirsten here.  I hope you had a lovely weekend.  It was a bank holiday today & the weather was pretty terrible here.  I continue to hope for a gorgeous summer....


Last Friday was Lisa's class in Maidstone & it was all about creating backgrounds.  Today's cards were made by Lisa for the second part of the class, where she showed us how to create a background using a brayer.


I've had a brayer for ages & occasionally had a play with it, without much success, so it was great to have Lisa explain & demonstrate a few techniques that we were able to use to make mountains, a sun - or moon - and a border.  Speaking for myself, I need LOTS of practice & despite having one of those days, where nothing went right for me, I was quite pleased with my first attempts. 


Many of you will recognise the lovely images on these cards as being from Lavinia Stamps. She used Distress inks & Adirondack inks to create these backgrounds & then overstamped the images with black Archival ink.  She added detail with Glossy Accents & Distress Stickles.


I hope to be back tomorrow to show you the rest of Lisa's samples from this month's class.  Until then, thank you for looking &

Keep crafting.

Kirsten.