Monday, 9 January 2017

That's Crafty Butterfly Acrylic Stacker


Good morning, Kirsten here, I hope the first week of 2017 has been good to you. Neither Lisa or I have had time to make anything new for the blog this month, so I reminded her that we had never go round to showing you the That's Crafty! acrylic stackers we made for the Extravaganza Day last July. Here's my first one; the Butterfly Stacker, made with chalk paints, Starlights, stencils & Stampendous stamps...........

***Don't forget to remove the protective sheets from each side of the acrylic pieces.***


The stackers come in four pieces; 3 acrylic layers & 1 MDF layer. I kept the MDF layer very simple, painting & stencilling it with Deco Art chalk paint, white gesso, Rich Gold Starlights


I stamped the Stampendous Field of Poppies stamp onto the reverse of the three pieces of acrylic with Jet Black Stazon ink, moving it each time to get a different height of the flowers. The great thing with acrylic is that you can layer up the pieces as you work to see how they look. And if you don't like them, or make a mistake, just remove the ink with alcohol solution & a soft cloth & start again.


 I wanted to see if Starlights paints would work on the acrylic & of course they do! I began by painting on a very thin layer with a narrow paintbrush & made sure it was thoroughly dry before adding more thin layers. I used Red, Green, Menthol & if I remember correctly, Bright Fuchsia & Cyclamen............


After the final layer of Starlights I painted white gesso on top. You won't see this when you turn the acrylic pieces over to the 'right' side, but it really helps the colours to stand out & the shimmer of the Starlights looks lovely shining through the acrylic.


I stamped the quote onto the second piece of acrylic with black Stazon ink. It's from the Stampendous 'Life is Art' stamp, I masked off the rest of the stamp so that I stamped was 'Paint your dreams...' After that I put all the pieces together with the screws supplied in the stacker pack & that was it.........


Butterfly Acrylic Stacker   Dinky Stencil - Bubbles Dinky Stencil - Distressed Harlequin Rich Gold SL Americana Chalky Finish Paint - Delicate    Americana Chalky Finish Paint - Escape    Field of Poppies  LIFE IS ART  Stazon Jet Black

I was so pleased with how this turned out, hope you like it too. I'll be back next week with another of my stacker projects. Have a great week.

Kirsten

Friday, 6 January 2017

In The Garden


Happy New Year to you all, I hope it was a good one.  Ours was very quiet, my husband was poorly and in bed so I spent the evening watching Robbie Williams then the fireworks then a bit of Hootenanny, but good anyway.

I thought I'd carry on with the little wooden embellishments this month but this time using the Fence and Lanterns.


I started with my usual 7" x 7" white card blank and matted it with some Silver Pearlised Card then cut a smaller piece of White Pearlised Card that I would use as my topper.
 
I took the small fence and stippled it directly with Silver Starlights then once it was dry I randomly dabbed on some White Gold Starlights, then done the same to one of the lanterns.


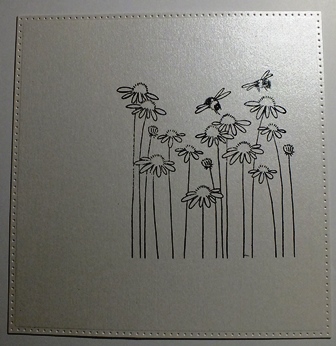
For the image I used the Stampendous Field Of Daisy's but I think that the Field of Poppies would work just as well.  I masked off about a third of the stamp so that it would fit inside the fence which I was using as a planter.  I then stamped the image to one side of the card.


Then started to fill in the petals using a very small amount of Rusty Patina - Blanc mixed with an equal amount of Pearl Starlights, then dabbed the petals with the mix using a very fine detail paint brush.  I coloured in the centres just with a bright yellow colouring pencil and the bees using a small mixture of Rusty Patina and White Gold Starlights.  I then used a fine line black pen to go around the petals to make them stand out more.


Once it was all dry I masked the image, created a mound with a post it note then distressed with Mowed Lawn, then distressed the sky using Tumbled Glass ( I didn't notice the black marks until I took the photo, and rubbed them out later)


I then placed a backing to the planter with a little piece of white card so I could 3D it. Then stuck the lantern in place on the mound added a little sentiment and the card was done.

 
Very quick and easy again for you.
Thank you for dropping by the blog today, look forward to next Friday
Love Jan -x-


Thursday, 5 January 2017

A Home Sweet Home Card Using Wooden Embellishments


Hello, hello all and happy 2017! Have you made any resolutions to yourself? Any craft related ones? I really need to get into the habit of making cards in advance and having a 'stock', so maybe I will have a go at that idea!

A new year and a new home for a friend of mine, so my first make reflects this. Lisa has recently got some fabulous wooden embellishments in stock from Craft Emotions, so I had a play with some of these. They all take paint really well and don't need priming, so as well as being light, they are easy to work with.

I chose a beautifully detailed frame from the Frames with Ornaments Set, along with a house from the Home Sweet Home Set and painted with Turquoise Starlight Paint. I used Silver Starlight Paint to colour two little signs and two little keys, again from the same sets.


Turning the painted pieces over, I used some brads and Baker's Twine to 'string' the signs as though hanging within the frame.


I cut some dotty card and matching background card from the Anna Marie Designs range to form matts and layers for the frame.


I then fiddled with the elements before finally sticking down to my card base.


Very easy to do, with the embellishments doing the talking really! Have a play; those wooden packs are great value and you get loads in them too!

Love
Martina
xx

Frames With Ornaments CEWHome Sweet Home CEWTurquoise SLSilver SL2mm Bakers Twine - Gold & Ivory Dottie Card


Wednesday, 4 January 2017

Happy New Year with That's Crafty Acrylic Stackers......


Good morning my lovelies and Happy New Year to you all,

Let's hope that 2017 will be a much happier, healthier year for us all. I do hope that you all had a lovely Christmas and New Year and spent time with those that mean the most to you whoever they may be!
I really enjoyed my Christmas with my family but they all ended up getting the lurgy that is going around at the moment and it has now found it's way to me and Paul, my husband!!
But hey ho, we dose up and carry on........

I am busy getting ready for Hochanda TV Shows with Imagination Crafts. We are launching a new ODS on 7th January at 8pm and 8th January and I will be joining Sue and Kerry Ann with some fabulous new products at incredible prices and fantastic demos lined up, so be sure to tune in at: Sky 663, Freeview 85, Freesat 817 or online in HD: https://www.hochanda.com/

Sooooo.......

Today I thought that I would show you some That's Crafty acrylic stackers that I made last year and both Kirsten and I did not get time to blog them, so we thought that we would save them for January. It is also something that I want to teach this year as they are fabulous to make and really quite addictive once you have made one!!

They comprise of four layers, one mdf and three acrylic. Two of the acrylic layers are thinner than the other one and it is up to you how you wish to sandwich them with the screws that are provided.

Below are a couple that I made, the first one is a Panel 1 Stacker and I used Distress inks, Starlight Paints and Stampendous stamps on it.......

I really love how you can build a scene up in layers and get so much depth to the project......


The second project that I have to show you today is a Acrylic Book, now I really love these as you can pretty much do anything to them from stamping and painting to adding rice papers to them, photos, treating them like a scrapbook......whatever you want to really. I just love the way you can see through the acrylic to other pages. I chose not to use the mdf front on this one as it comes with a front and back mdf cover and three inside clear acrylic pages.

Again I used Distress inks, Starlight paints and Stampendous Stamps. I really loved building up the scene and adding the depth layer by layer and watching the book come to life.....


Open or closed there is so much depth to look at......


Well I do hope that this is something that inspires you and you fancy having ago as these gave me so much pleasure to create. 

That is all from me for now, have a great week....

Hugs Lisa B xxx

Panel 1 Stack  Acrylic/MDF Book   Field of Daisies
Celebrate Birthday    Garden Hive DANCE LIKE...

Monday, 2 January 2017

Celebrate You


Hello! Kirsten here with a scheduled post. I hope you've had a wonderful weekend. This is a very quick blog post to show another of my That's Crafty! postcards. Whereas on last week's postcard I began by painting the background with chalk paint, this time I painted the background with Starlights, then added chalk paint & finished with more Starlights.................


The background colours are Rich Gold, Amethyst & Cyclamen Starlights, blended with my fingers. The next layer was Deco Art Escape chalky finish paint through the Imagination Crafts' Diamonds stencil, then white gesso & Black Starlights through Imagination Art stencils..........


I added Red Starlights through the Art stencil MU43 for the focal images & used words from the Stampendous 'Celebrate Birthday' stamp on black card with white embossing powder for the sentiment...............


MU43 IMST MU42 IMSTMU17 IMSTAmericana Chalky Finish Paint - Escape Celebrate Birthday         Emboss Ink Pads   

Bright White Regular WEP  


That's all from me for this week. Have a lovely day & I hope 2017 will be your best year yet.

Kirsten