Thursday, 7 January 2016

Creating a Little Magic with Brushos

Good morning all! Well, we are in the New Year and as I get older time does seem to fly past... I was just thinking: do you remember when we were all sitting there wondering if the world was going to be plunged into the dark ages when the year 2000 hit us? There was so much speculation at the time! Now we have even past the date set in the 'Back to the Future' films and as, everyday technology evolves, it leaves me wondering if we are heading for a 'Terminator' like future...
 
My way of hiding from the everyday is usually to disappear into a magical world somewhere, so I decided to create a little magic with my samples for this week. To help me, I have used my Brushos again, as these are such quirky little pots of wonder that scream fairy dust and mystique to me!
 
To start, I decided on a card blank size (6x6") and decided on the size of the layer my 'topper' was going to be. I then sectioned off this size on a piece of Watercolour Card so as to help me plan my layout and positioning. I like to use Watercolour Card with Brushos as the fibres in the card allow for some 'playtime' with the pigments and are more forgiving. I will try to elaborate on this as I go along...
My first stage was to stamp a castle stamp from my stash (Visible Image) into one corner of my topper area. I stamped using  Black Onyx Versafine to preserve the detail and heat embossed using Clear Wow Powder as this would allow me to colour the picture using my Brushos (you could just use Jet Black Staz On if you'd rather, but I am partial to embossing!). I also stamped the same image onto a sticky note to create a mask for later on.
 
 
Putting my mask over my castle, I sprayed some water over the rest of the topper area I had sectioned off and then sprinkled three of the Brusho colours onto my paper (black, emerald green and turquoise).

 
Next I wanted to colour my castle. I sprinkled some of the crystals from the black Brushos pot into a palette and added some water. I then painted the castle, trying to add some light and shade for some depth. The cardstock helped me to blend the watercolour and use the pigments just as you would a paint normally.

 
Next, I stamped a large Lavinia dragon stamp and embossed as before. I realised after I had done this that I really should have stamped the dragon first before applying the Brushos, as you could see some of the intense colour through his body (hard to see in the picture, I know).

 
Right, here is where you will see that my card making in this case took a slight deviation from the original plan... I didn't like the colours I had chosen, or the 'translucent' dragon! The colours are great for a different card, but not using the plan I had in mind, so here's where my journey went...
 
Not wanting to waste my castle, I cut this out of the paper ready to use again. I drew the topper size out again on a fresh piece of Watercolour Card, placed the castle into position and then stamped the dragon where I wanted it.

 
I removed the castle and then applied yellow, leaf green and brilliant red Brusho crystals to the card randomly. I sprayed water onto the card, adding more where I wanted to brighten the colour. I also 'dabbed' the card using a muslin to remove some of the colour intensity creating a more muted effect. Once this was dry, I used a script stamp to stamp across the whole page (using the 2nd generation of ink). At the last minute I realised I wanted a sentiment, so I used the Lavinia 'Believe in Magic' stamp in the corner. Around the edge of the card I wanted to echo the theme and so some 'fire' seemed in order for my dragon. I reached for my Indigoblu Flitter Glue and applied around the outside edges with a sponge. I then applied some Morris Dance Gilding Flake  and rubbed over to burnish (there are loads of options for flake colours, I used Morris Dance as it has loads of green and I wanted to pick this out).

 
Finally, my topper was nearly complete! I stuck to my card blank, matting with some green card. I applied my castle shaping it first, adding some string and some charms. I made it very 3D with some glue gel. This worked really well I think, and gave some dimension. There you have it; not as planned, but it evolved and I like the final one better anyway!
 
 
In the same vein, I also created a more 'feminine' magic card as well... (the last one was really for my husband's birthday!)
This time I stamped Lavinia's 'Nissa' onto Watercolour Card and embossed in the same way as before. I also stamped the same sentiment, some insects and some Dandelions. I then applied some water, Brusho colours and blotted the paper. Once dry, I stamped some more Lavinia Foliage stamps in the background, this time using Vintage Sepia Versafine. Some ink around the edges and to ground the fairy, some Silver Glitter dotted around the scene and on the fairy wings and the card is complete.


I hope you like them both! You can't beat some escapism.
Thank you for reading,
Lots of love,
Martina
xx
 
 
Watercolour CardVersaFine Ink pad - Onyx Black WA01 Clear GlossStazon Jet BlackBrusho Crystal Colours - Starter Pk 2 Pk of 24Believe in MagicFlitter GlueMorris DanceNissaDandelionsBluebellsDandelions 2LavenderThistlesHalo Glitter - Silver


Wednesday, 6 January 2016

Hobby Art Design Team Day.......


Good morning my lovelies,

Happy New Year!

I don't know about you but is anyone fed up with the rain yet? I know we have had a very mild winter so far but I find it so depressing getting soaked every day. I would rather it be dry and frosty and I don't like the cold, well my bones don't!! At least it might kill off a few nasty bugs!

My heart goes out to everyone affected by the awful flooding in the north of the country. There are now local places to me in the south that are on high alert for flooding. It has  been awful watching the news & the devastation that it is causing to peoples lives.  Lets hope that they get as much help as possible with the clean up and the government do their bit to help these people as it is going to be a long and arduous time for them....... 

On to pastures new........

Have you made any new year resolutions? 

Have you broken them yet, lol.....?

I know it is the time of year that we really try to set ourselves new goals and aims but life does sometimes get in the way......
I have told myself that I am going to try to be a little kinder to myself this year and look after my health a bit more and try to slow down and walk with the crowd instead of running a marathon every week!!
I am not getting any younger unfortunately and the body doesn't respond as well as it used to when I stretch it to the max!

Anyway 'at last' I have found time to show you a few projects that I made in late November at the Hobby Art Design Team weekend and what a fabulous weekend it was.


Thank you to Jenny, Becki and the rest of the dt team for making it such a lovely and enjoyable weekend.
We had such a fantastic time and so much fun and laughter and even crafted on the first night until
12 0'clock midnight, yes midnight!!!

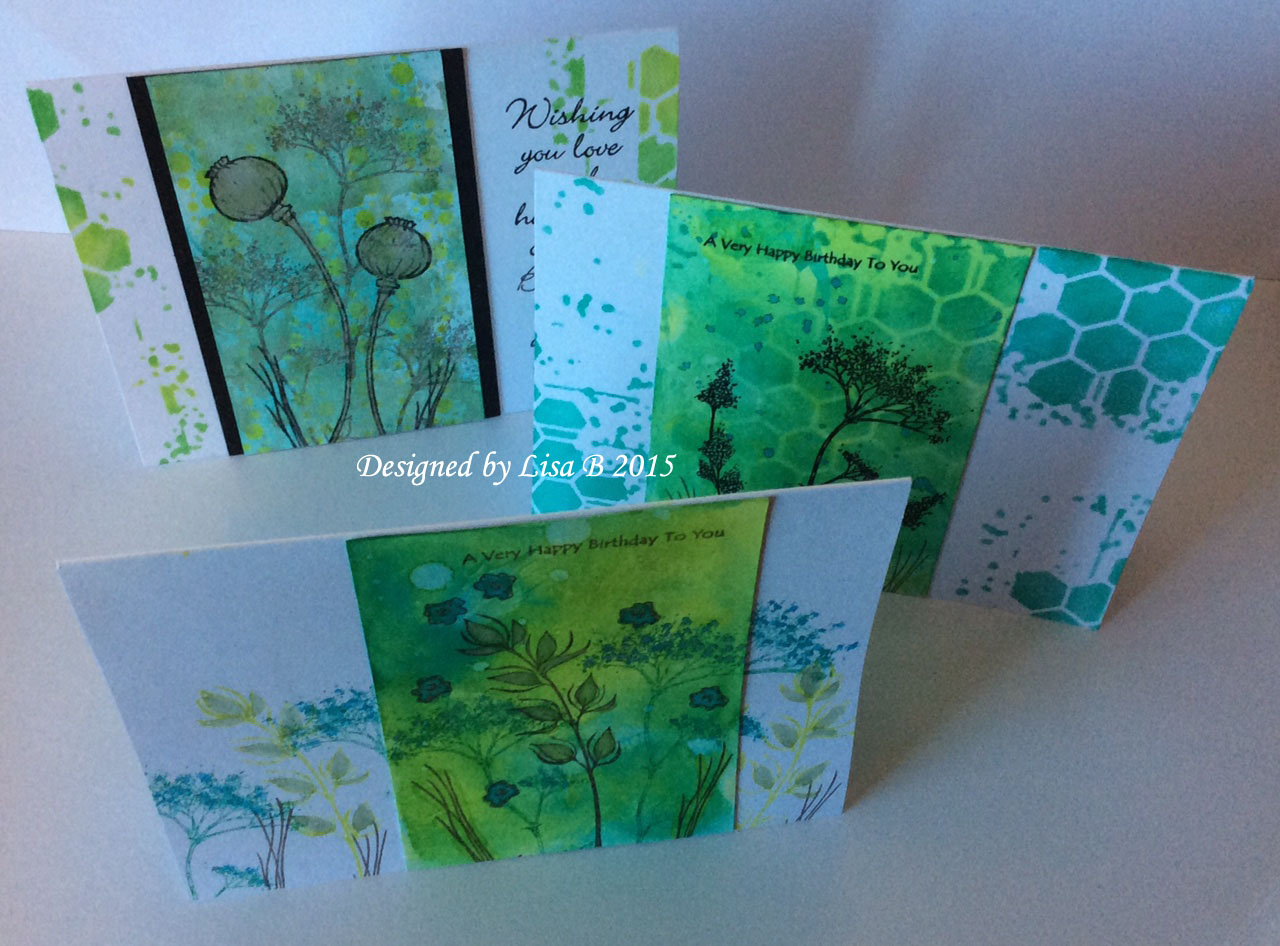
Here are just some cards I made using the gorgeous Wildflowers stamp set from Hobby Art, some Distress inks and stencils.

The lovely Kim Reigate gave us a little demo and then we did our own things and it was great, I really enjoyed just playing around......


After over indulging on fabulous food on Saturday lunchtime, evening meal at the local pub that night and then back to crafting until midnight, not too mention breakfast the next morning!!....... it was Sunday and we got to make a fabulous canvas with the lovely Christine Dark and get really messy, Becki even presented me with a spray suit to wear!!!!

Who told them I get messy, lol!!!

This was right up my street and I looooved making it. A few of the girls at never really dabbled in mixed media but it was so great to see them get out of their safety boxes and have a go and they produced great canvasses, it was just so much fun......

Here is a look at the canvas that I made, I went for my usual go to colours of greens and blues......


A closer look.......

We used Brushos for the background and texture pastes through stencils. Die cut elements and
stamps.......


and Frantage too........


Along with the added bit of Starlight paints and Alchemy waxes.........it was just so great getting to have a couple of days off and just play and be creative.......

This month on the blog we will be showcasing some of our favourite things from 2015 and having a look back at what products inspired us to have a go with and what we created with them.

If you have any favourite products or techniques that you enjoyed seeing from 2015 then let us know.
It is great to see what other crafter's get up too, you can always post them on the lisabdesigns Facebook page : https://www.facebook.com/LisaBDesigns

Well that is all from me for now, I am off on a little trip today until Monday and will be working on some exciting stuff coming very soon and should be able to share it with you next week......
So watch this space!

Have a lovely week and I will be back soon.....

Big hugs Lisa B xxx


Monday, 4 January 2016

Starlights & Designs by Georgina Poinsettia


Good morning, Kirsten here, happy Monday. I hope you've had a great New Year weekend, here's wishing all of us a wonderful 2016. I'd like to show you my final Christmas project today. I painted the Poinsettia Layers chipboard kit from Designs by Georgina with Dark Orchid, Silver & Green Starlights..........


To give some texture to the poinsettias, I applied Sweet Poppy Glossy White dimension paste through the TCW Mini Dashed Lines stencil before painting...........


I painted a piece of Super Smooth white card with Menthol Starlights, then die cut it with the Sue Wilson Trailing Ivy cutting dies........


I finished the piece with some adhesive gems & a length of ribbon.


Dark OrchidGreenMentholSilverMini Dashed Lines   Dimension Paste - Glossy White    Diamond Gems Clear - 80 pieces


Sunday, 3 January 2016

December's Blog Challenge Winner


Good morning, I hope everyone had a great New Year. Thank you to everyone who entered the Deecember blog challenge, your projects were great.

The entrants were:

Via inLinkz:

Samantha Wade 1
Lynda Hall 2
Jennifer Bradley 3
Samantha Wade 4
Mags 5

Via Facebook/email/etc.:

Joyce Evans 6
Sarah Clayton 7
Sarah Clayton 8
Adele Tidball 9
Gill Durrant 10
Tonia Crouch 11
Tonia Crouch 12
Joyce Evans 13

Those who used Starlights:

Joyce Evans 14
Sarah Clayton 15
Sarah Clayton 16
Tonia Crouch 17
Tonia Crouch 18
Joyce Evans 19

As always, random.org chose the winner.........

Sarah Clayton!!!

Congratulations Sarah!

Please contact Lisa within the weeklisabaker1@btinternet.com - and she will send you your e-voucher code.


Please note the £20 prize does not include P+P.
The blog challenge will return on February 7, to coincide with the first class of 2016 on Friday, February 5. Thank you to everyone who supported the challenge in 2015, we hope to see you entering again this year. 

Enjoy the rest of your weekend & have a great January.
Kirsten 

Friday, 1 January 2016

Happy New Year with Starlights........


Morning my lovelies,
 
I do hope that you all had a wonderful New Years Eve and didn't over indulge too much so as to spoil the day. Wishing you all a wonderful, happy, healthy and prosperous new year to come......


I spent a day with some really lovely, special people over Christmas and they told me about a little idea that I am going to do this year to give me a more positive year ahead and I want to share it with you.......
 
 It is always this time of the year that you look back and nearly always remember the not so good things that have happened during the past year whether they be big or small and then wish for a better year to come....you know we all do it!.......
 
BUT.......
 
They suggested to me to take a large jar ( and lets face it with Christmas over we probably have enough pickle jars!!! )........and every time something good happens or something that really makes you laugh or smile or your hear from an old friend, or someone does something thoughtful or just anything that makes you feel GOOD, maybe an achievement........write it down on a piece of paper, fold it up and put it in the jar.
 
Now come on...... We are crafters let's call them 'Memory Jars' and let's decorate the jar with ribbons and maybe some charms and let's write it on the back of a coloured bit of paper so that the jar fills with colours all through the year......
 
I will be sharing my 'Memory Jar' with you soon......so let's see yours too.
 
Then at this time of the year open that jar and read all the good things that have happened regardless of the bad things and let us not wish our lives away on to another year, let us look back and be thank full for the another year that we have all shared together as we all know it doesn't last forever.......


So, today I thought I would show you a few more Christmas cards that I managed to make before Christmas using the fabulous Starlight paints and combining a couple of recent ideas and techniques that we have shown you. Here they are with a list of products used:


 Products used:
Leane Creatief - Multi Flower die -004
Sue Wilson - Trailing Ivy
Card-io Stamps - Festive Fir Cones
Distress Ink - Tumbled Glass
Embossing folder from stash


Card two....... 
 
 
 Products used:
Sue Wilson - Holly Sprays
Card-io Stamps - Winter Woods
Distress Ink - Tumbled Glass


Card three.... 
 
 
 Products used:
Leane Creatief - Multi Flower die -004
Sue Wilson - Holly Sprays
Card-io Stamps - Christmas Scenery 1
Distress Ink - Tumbled Glass


 Well that is all from me for now peeps, have a lovely day and here is too the New Year and I will be back soon with some more inspiration.
 
Remember if you need a little mojo to get you back in to the crafting you can always take a peek at out Pinterest Boards HERE or you still have time to enter our challenge which closes on the 2nd January and win yourself a £20 e-voucher for the website.....
 
Big hugs Lisa B xxx